Edition
Princípio
It is possible to allow users to edit spatial and attribute data from the Lizmap Web Client interface for PostgreSQL layers. The Lizmap plugin allows you to add one or more layers and choose what actions for each will be possible in the web interface:
criar elementos
modificar atributos
modificar a geometria
apagar elementos
O formulário Web apresentado ao utilizador para preencher a tabela de atributos suporta as ferramentas de edição disponíveis no separador campos das propriedades da camada vetorial do QGIS. Pode configurar uma lista de valores, ocultar uma coluna, torná-la não editável, utilizar uma caixa de verificação, uma área de texto, etc. Toda configuração é feita com o rato, tanto no QGIS como no plugin Lizmap.
Além disso, o Lizmap Web Client deteta automaticamente o tipo de coluna (integer, real, string, etc.) e adiciona as verificações e os controlos necessários nos campos.
Exemplos
Uma cidade deseja que os cidadãos identifiquem problemas visíveis na estrada: lixo não recolhido, iluminação danificada, destroços a serem removidos. O administrador do projeto QGIS cria uma camada dedicada a recolher dados e a apresentá-los para todos.
Um gabinete de engenharia quer permitir que os parceiros do projeto tracem observações sobre as áreas do mesmo. É possível a adição de polígonos numa camada apropriada.
Pré-requisitos
Para permitir a edição de dados no Lizmap Web Client, deve:
Have vector layer stored in PostgreSQL.
The vector layer mustn’t have space in field names.
Configure the editing tool for the layer in . This is not required but recommended to control the data entered by users. See Customize the edition form for more information about layout, widgets, expressions, constraints in a form.
The layer must be published as WFS (see OGC Services Capabilities) and the primary key must be published as well in the Layer properties.
Despite we want to edit the layer, there is no need to use Update, Insert and Delete checkboxes in the WFS table in the QGIS Server tab. Lizmap does not use WFS-T. Lizmap will make the edit directly on the datasource. The configuration is done only in the panel described below.
As a consequence as above :
The credentials must not use the Authentification system provided by QGIS for a layer with edition capabilities. Credentials must be either in the QGS project file or in the PostgreSQL service file (recommended, more secure because credentials are not stored in the QGIS project) :
Nota
É necessário ter algum cuidado caso a camada contenha valores do tipo Z ou M, infelizmente o Lizmap irá definir os mesmos como «0», utilizando assim o valor padrão para os gravar na base de dados.
Configuring the tool
Aqui estão os passos detalhados:
Se necessário, crie uma camada na sua base de dados com o tipo de geometria desejado (ponto, linha, polígono, etc.)
pense em adicionar uma chave primária: isso é essencial!
A coluna da chave primária deve ser do tipo incremento automático. Por exemplo serial para PostgreSQL.
pense em adicionar um índice espacial: isso é importante para o desempenho
*crie campos estritamente necessários para atributos *: se possível, use nomes de campo simples!
Please refer to the QGIS documentation to see how to create a spatial layer in a PostgreSQL database: https://docs.qgis.org/latest/en/docs/user_manual/managing_data_source/index.html
To enable a layer with edition capabilities:
Click the
 button.
Selecione a camada na lista de valores
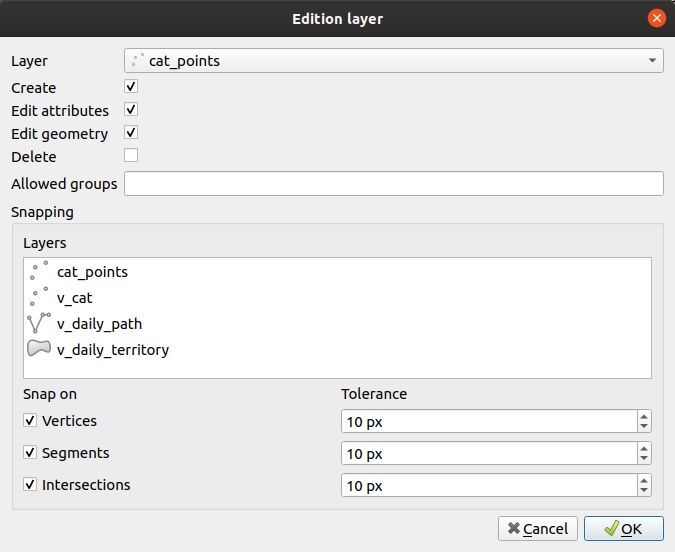
- Marque as ações que pretende ativar:
Create
Edit attributes
Edit geometry
Delete
Optional, you can add a list of groups which are allowed to edit, separated by a comma.
- Snapping can be activated if you select at least one layer in the layer list.
The layer must be published as WFS (see OGC Services Capabilities) and the primary key must be published as well in the Layer properties.
- If one layer is selected above, at least one checkbox must be used :
Vertices
Segments
Intersections
It’s possible to set the tolerance for the snapping.
To edit a layer in the table, select it and click the
 button or double click on the row.
To remove a layer from the table, select it and click the
 button.
To move a layer up or down, select it and click
 or
or  buttons. The order will change in Lizmap too.
Fields will be displayed with their alias if it’s defined. See Add a alias on a field.
Reutilização de dados das camadas para edição
As camadas selecionadas para a ferramenta de edição são «camadas como as outras», o que significa que:
Os estilos e etiquetas QGIS são aplicados a essas camadas. Pode criar estilos e etiquetas que dependam de um valor de uma coluna da camada.
Se pretender disponibilizar a ferramenta de edição, mas não permitir que os utilizadores visualizem os dados da camada on-line (e, portanto, as adições de outros utilizadores): pode simplesmente ocultar camadas de edição colocando-as num diretório oculto. Veja Mascarar camadas individuais
As camadas são imprimíveis se não estiverem mascaradas.
Os dados são armazenados numa camada do projeto. O administrador pode recuperar esses dados e utilizá-los posteriormente.
Nota
Utilizando a cache: para utilizar a cache do servidor ou do cliente em camadas para edição, faça-o conscientemente: os dados não serão visíveis para os utilizadores até que a cache não tenha expirado. Sugerimos não ativar a cache em camadas para edição.
Adicionar ficheiros e imagens a elementos
Use the media/upload folder relative to the project
It is possible to upload your files, including images, for each feature, during online editing; to achieve this, you need to:
Configure edition for the layer, with one or more fields with the edit type
PhotoorFile. For example, let say the field name isphotoCreate a folder at the root of the QGIS project file :
media/and a subfoldermedia/upload(obviously you need to do that locally in your computer and server side).Give to the webserver user (usually www-data) write permission on the upload folder, so that it can create files and folders in
media/upload:chmod 775 -R media/upload && chown :www-data -R media/upload
Check you
php.inito see if the variablespost_max_sizeandupload_max_filesizeare correctly set (by default, PHP only allows uploading files up to 2 Mbyte)
Lizmap will then create folders to store the data, depending on the layer name, field name, etc. For example, a file would be stored in the folder media/upload/PROJECT_NAME/LAYER_NAME/FIELD_NAME/FILE_NAME.EXT and an image in media/upload/environment/observations/species_picture/my_picture.png.
Obviamente, o Lizmap conseguirá apresentar esta imagem (ou qualquer outro ficheiro) na popup, tal como o mesmo foi armazenado na pasta de media. Veja Utilização de popups
Use a specific destination folder
You can override the default destination folder media/upload/PROJECT_NAME/LAYER_NAME/FIELD_NAME/FILE_NAME.EXT by manually setting the path where to store the media, relatively to the project. To do so, you must use the External resource field edit widget, and configure it with:
a Default path written relative to the project. For example
../media/images/if you want to store this field files in a folder media situated alongside the project folder. You can also choose set a path inside the project media folder. For examplemedia/my_target_folder/.check the Relative path checkbox, with the default Relative to project path option
if the field should store a image, you should also check the Integrated document viewer checkbox, with the type Image
This allow to store the sent media files and images in a centralized folder, for example a directory media at the same level than the Lizmap repositories folders:
media
images <– to store images in this folder, use
../media/images/pdf
environment
trees.qgs
trees.qgs.cfg
media
tree_pictures/ <– to store images in this folder, use:
media/tree_pictures/