Filtered layer by user
Princípio
Normalmente, a gestão dos direitos de acesso aos projectos Lizmap é feita através do diretório. Neste caso, a configuração é feita através da interface de administração do Lizmap Web Client. Veja Definir as permissões de cada grupo. Isso ocultará completamente alguns projetos com base nos grupos de utilizadores, mas requer um diretório e gestão de projetos.
Em vez disso, o recurso de filtragem aqui apresentado permite que publique um único projeto QGIS e filtre os dados apresentados no mapa com base no utilizador ligado ao sistema. É possível filtrar apenas camadas vetoriais porque o Lizmap utiliza, para o efeito, uma coluna da tabela de atributos.
Atualmente, o processo de filtragem utiliza o ID do grupo de utilizadores ligado à aplicação Web. O mesmo estará ativo para todas as solicitações feitas ao servidor QGIS e, portanto, diz respeito a:
as imagens de camadas vetoriais apresentadas no mapa
the popups. See Popup
as listas de recursos Localizar por Camada. Veja Localização por camada
drop-down lists of Editing forms from Value relation. See Edition
próximos recursos (apresentação da tabela de atributos, recursos de pesquisa, etc.)
Exemplo
Está disponível um vídeo tutorial em: https://vimeo.com/83966790
Configuring the tool
Para utilizar a ferramenta de filtragem de dados no Lizmap Web Client, deve:
use QGIS 2 on the server
ter acesso à interface de administração do Lizmap Web Client
Aqui estão os passos detalhados para configurar este recurso:
Aviso
In Lizmap Web Client administration, in the repository properties, be sure that anonymous and other relevant groups are not checked
for Always see complete layers data, even if filtered by login. See Definir as permissões de cada grupo.
Check group ID or user ID in the administration interface:
To know group ID, you must go to the administration interface : ID appears in parentheses after the name of each group (under the title Groups of new users)
Or to know the user ID, just use its login.
For all vector layers which is desired filter data, just add a text column that will hold the ID for each line who has the right to display this feature.
Fill this column for each line of the attribute table with the ID (using the calculator, for example).
It is possible to set
allas the value in some lines to disable the filter: All users will see the data for these lines.Se o valor nesta coluna para uma linha não corresponder a um grupo de utilizadores, os dados não serão apresentados para nenhum dos utilizadores.
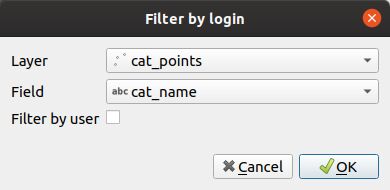
Add the layer in the table Filter Data by User panel:
Click the
 button.
Select layer from the dropdown list
Select the field with the ID
Check the box if the field contains user ID, instead of group ID
To edit a layer in the table, select it and click the
 button or double click on the row.
To remove a layer from the table, select it and click the
 button.
Aviso
Disable the client cache and cache server for all filtered layers. Otherwise, the data displayed will not be updated between each connection or user logout!
Edition
If you have enabled the edition (see Edition) on the filtered layer, the field containing the ID will be editable with:
either a combobox for a non admin user with either his own login or
allor a line edit to write a value for a admin user