Edition
Principle
It is possible to allow users to edit spatial and attribute data from the Lizmap Web Client interface for PostgreSQL layers. The Lizmap plugin allows you to add one or more layers and choose what actions for each will be possible in the web interface:
creating elements
modifying attributes
modifying the geometry
deleting elements
The Web form presented to the user to populate the attribute table supports editing tools available in the fields tab of the QGIS Vector layer properties. You can configure a dropdown, hide a column, make it non-editable, use a check box, a text area, etc. All configuration is done with the mouse, in QGIS and the Lizmap plugin.
In addition, Lizmap Web Client automatically detects the column type (integer, real, string, etc.) and adds the necessary checks and controls on the fields.
Examples
A town wish that citizens identify visible problems on the road: uncollected trash, broken street lights, wrecks to remove. The QGIS project administrator creates a layer dedicated to collect data and displays them to all.
An engineering office wants to allow project partners to trace remarks on the project areas. It allows the addition of polygons in a dedicated layer.
Prerequisites
To allow data editing in Lizmap Web Client, you must:
Have vector layer stored in PostgreSQL.
The vector layer mustn’t have space in field names.
Configure the editing tool for the layer in . This is not required but recommended to control the data entered by users. See Customize the edition form for more information about layout, widgets, expressions, constraints in a form.
The layer must be published as WFS (see OGC Services Capabilities) and the primary key must be published as well in the Layer properties.
Despite we want to edit the layer, there is no need to use Update, Insert and Delete checkboxes in the WFS table in the QGIS Server tab. Lizmap does not use WFS-T. Lizmap will make the edit directly on the datasource. The configuration is done only in the panel described below.
As a consequence as above :
The credentials must not use the Authentification system provided by QGIS for a layer with edition capabilities. Credentials must be either in the QGS project file or in the PostgreSQL service file (recommended, more secure because credentials are not stored in the QGIS project) :
Note
Be careful if your layer contains some Z or M values, unfortunately Lizmap will set them to “0” which is the default value when saving to the database.
Configuring the tool
Here are the detailed steps:
If necessary, create a layer in your database with the desired geometry type (point, line, polygon, etc.)
think about adding a primary key: this is essential!
the primary key column must be of type auto-increment. For example serial to PostgreSQL.
think about adding a spatial index: this is important for performance
create as many fields as you need for attributes: if possible, use simple field names!
Please refer to the QGIS documentation to see how to create a spatial layer in a PostgreSQL database: https://docs.qgis.org/latest/en/docs/user_manual/managing_data_source/index.html
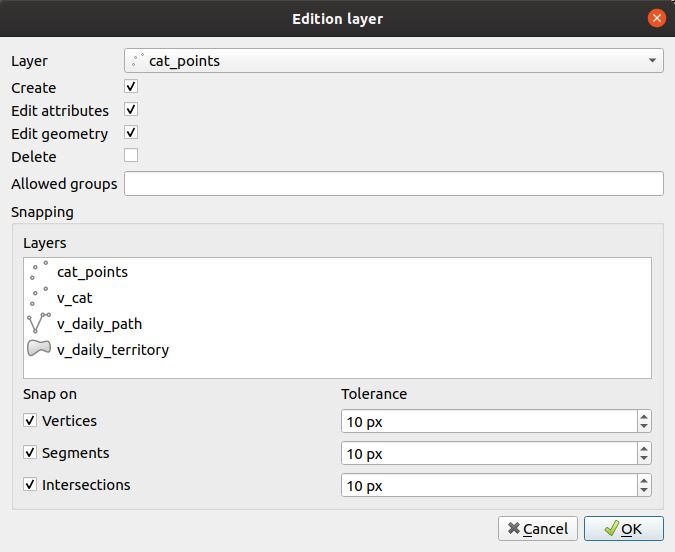
To enable a layer with edition capabilities:
Click the
 button.
Select the layer in the drop-down list
- Check the actions you want to activate from:
Create
Edit attributes
Edit geometry
Delete
Optional, you can add a list of groups which are allowed to edit, separated by a comma.
- Snapping can be activated if you select at least one layer in the layer list.
The layer must be published as WFS (see OGC Services Capabilities) and the primary key must be published as well in the Layer properties.
- If one layer is selected above, at least one checkbox must be used :
Vertices
Segments
Intersections
It’s possible to set the tolerance for the snapping.
To edit a layer in the table, select it and click the
 button or double click on the row.
To remove a layer from the table, select it and click the
 button.
To move a layer up or down, select it and click
 or
or  buttons. The order will change in Lizmap too.
Fields will be displayed with their alias if it’s defined. See Add a alias on a field.
Reusing data of edition layers
The layers that you have selected for the editing tool are “layers like the others”, which means:
QGIS styles and labels are applied to these layers. You can create styles and labels that depend on a value of a layer column.
If you want to propose the editing tool, but does not allow users to view data from the online layer (and therefore the additions of other users): you can simply hide edition layers by putting them in a hidden directory. See Masking individual layers
The layers are printable if they are not masked.
The data are stored in a layer of the project. The administrator can retrieve this data and use them thereafter.
Note
Using the cache: whether to use the server or client cache for editing layers, do so by knowingly: the data will not be visible to users until the cache has not expired. We suggest not to enable the cache for editing layers.
Adding files and images for features
Use the media/upload folder relative to the project
It is possible to upload your files, including images, for each feature, during online editing; to achieve this, you need to:
Configure edition for the layer, with one or more fields with the edit type
PhotoorFile. For example, let say the field name isphotoCreate a folder at the root of the QGIS project file :
media/and a subfoldermedia/upload(obviously you need to do that locally in your computer and server side).Give to the webserver user (usually www-data) write permission on the upload folder, so that it can create files and folders in
media/upload:chmod 775 -R media/upload && chown :www-data -R media/upload
Check you
php.inito see if the variablespost_max_sizeandupload_max_filesizeare correctly set (by default, PHP only allows uploading files up to 2 Mbyte)
Lizmap will then create folders to store the data, depending on the layer name, field name, etc. For example, a file would be stored in the folder media/upload/PROJECT_NAME/LAYER_NAME/FIELD_NAME/FILE_NAME.EXT and an image in media/upload/environment/observations/species_picture/my_picture.png.
Obviously you will be able to display this image (or any other file) in the popup, as it will be stored in the media folder. See Use in popups
Use a specific destination folder
You can override the default destination folder media/upload/PROJECT_NAME/LAYER_NAME/FIELD_NAME/FILE_NAME.EXT by manually setting the path where to store the media, relatively to the project. To do so, you must use the External resource field edit widget, and configure it with:
a Default path written relative to the project. For example
../media/images/if you want to store this field files in a folder media situated alongside the project folder. You can also choose set a path inside the project media folder. For examplemedia/my_target_folder/.check the Relative path checkbox, with the default Relative to project path option
if the field should store a image, you should also check the Integrated document viewer checkbox, with the type Image
This allow to store the sent media files and images in a centralized folder, for example a directory media at the same level than the Lizmap repositories folders:
media
images <– to store images in this folder, use
../media/images/pdf
environment
trees.qgs
trees.qgs.cfg
media
tree_pictures/ <– to store images in this folder, use:
media/tree_pictures/