Editing — Edit a layer from the web interface
定義
ユーザーが ** PostgreSQL ** レイヤーのLizmap Webクライアントインターフェイスから ** 空間データと属性データを編集 ** することを許可することができます。Lizmap プラグインでは、1 つ以上のレイヤーを追加し、Web インターフェイスで可能なアクションを選択できます。
要素の作成
属性の変更
ジオメトリの変更
要素の削除
**属性テーブル** を設定するためにユーザーに提示 Webフォーム は、QGISベクトル レイヤープロパティ の フィールド タブで利用可能な 編集ツール をサポートしています。ドロップダウンを設定したり、列を非表示にしたり、編集不能にしたり、チェック ボックスやテキスト領域などを使用したりできます。すべての設定は、QGISとlizmapプラグインで、マウスで行われます。
さらに、Lizmap Web クライアントは自動的に列の型 (整数、実数、文字列など) を検出し、フィールドに必要なチェックとコントロールを追加します。
例
**A town** 市民が道路上の目に見える問題を特定することを願っています:未回収のゴミ、壊れた街灯、取り除く難破船。QGISプロジェクト管理者は、データを収集するための専用のレイヤーを作成し、それらをすべての人に表示します。
**An engineering office** は、プロジェクトパートナーがプロジェクトエリア上の発言を追跡することを可能にしたいと考えています。専用レイヤーにポリゴンを追加できます。
前提条件
lizmap Web クライアントでデータ編集を許可するには、次の手順を実行する必要があります。
ベクターレイヤーを PostgreSQL に格納します。
ベクターレイヤは、フィールド名にスペースを含んではいけません。
レイヤーの編集ツールを設定します。 :menuselection:` レイヤープロパティ --> 属性フォーム ` 。これは必須ではありませんが、ユーザーが入力するデータを制御するために推奨されます。フォームのレイアウト、ウィジェット、式、制約の詳細については、編集フォームのカスタマイズ を参照してください。
レイヤーは WFS として公開する必要があり ( WFS/OAPI を参照)、主キーは 、同様に公開する必要があります。 :guilabel:` レイヤプロパティ ` で同様に公開する必要があります。
レイヤーを編集したいにもかかわらず、:guilabel:'更新、:guilabel:`追加`と:guilabel:`削除`の各チェックボックスを使用する必要はありません。lizmapは WFS-T を使用しません。Lizmap はデータソース上で直接編集を行います。設定は、以下に説明するパネルでのみ行われます。
上記のような結果として:
資格情報は、編集機能を持つレイヤーのために ** QGISの認証システム ** を使用して ** はなりません ** 。認証情報は ** QGS ** プロジェクトファイルまたはPostgreSQLサービスファイル内のいずれかである必要があります ( 資格情報は安全のためQGISプロジェクトに保存しないことを推奨 ) :
'postgresql.org でサービスファイルを使用する方法<https://www.postgresql.org/docs/current/libpq-pgservice.html>`_
注釈
レイヤーに Z または M の値がいくつか含まれている場合は注意が必要ですが、残念ながら Lizmap はデータベースに保存するときにデフォルト値である「0」に設定します。
ツールの設定
詳細な手順は次のとおりです。
必要に応じて、目的のジオメトリ タイプ(ポイント、ライン、ポリゴンなど)を使用して、データベースに レイヤーを作成 します。
**主キー** を追加することについて考える:これは不可欠です!
主キー列の型は 自動インクリメント である必要があります。例えば*シリアル*からPostgreSQLへ。
**空間インデックス** の追加を考える:これはパフォーマンスにとって重要です
*属性に必要な数のフィールドを作成* :可能であれば、単純なフィールド名を使用してください。
Please refer to the QGIS documentation to see how to create a spatial layer in a PostgreSQL database.

編集機能を使用してレイヤーを有効にするには:
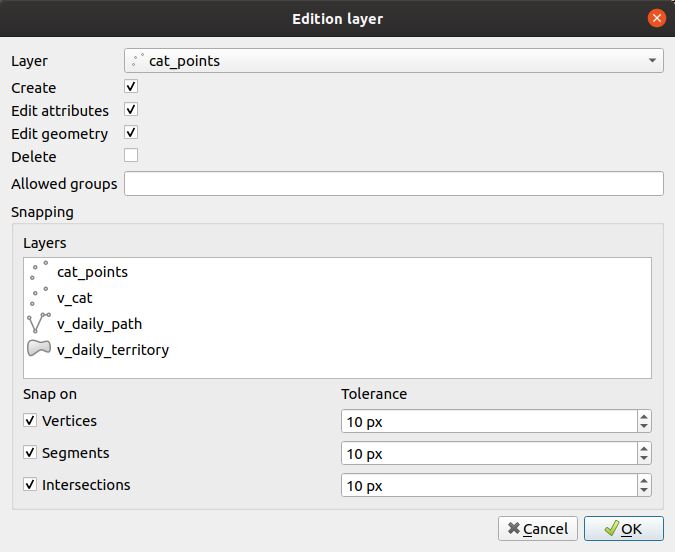
ボタン
をクリックします。
ドロップダウンリストから レイヤーを選択 してください*
オプションで、編集が許可されているグループのリストをカンマで区切って追加できます。
- レイヤー リストで少なくとも 1 つのレイヤーを選択すると、スナップを有効にできます。
レイヤーは WFS として公開する必要があり ( WFS/OAPI を参照)、主キーは 、同様に公開する必要があります。 :guilabel:` レイヤプロパティ ` で同様に公開する必要があります。
スナップの許容値を設定できます。
テーブル内のレイヤーを編集するには、レイヤーを選択して、
ボタンをクリックするか、行をダブルクリックします。
テーブルからレイヤーを削除するには、レイヤーを選択して、
ボタン。
レイヤーを上下に移動するには、レイヤーを選択して
または
ボタン。lizmapでも順序が変わります。
フィールドが定義されている場合は、エイリアスとともにフィールドが表示されます。参照してください フィールドに別名を追加する 。
Configuring the form
The form in Lizmap is inherited from the Layer Properties. Read the 編集フォームのカスタマイズ.
編集レイヤーのデータの再利用
編集ツール用に選択したレイヤーは、「他のレイヤーと同様のレイヤー」であり、次の意味を意味します。
**QGISのスタイルとラベルは、これらのレイヤーに適用されます。** あなたは、レイヤー列の値に依存するスタイルやラベルを作成することができます。
編集ツールを提案するが、ユーザーがオンラインレイヤーからデータを表示できない場合 (したがって、他のユーザーの追加): *あなたは単に *隠し ディレクトリに入れて、編集レイヤー** を非表示にすることができます。 個々のレイヤーの非表示 を参照。
**レイヤーはマスクされていない場合は印刷可能です**
**データはプロジェクトのレイヤーに格納されます** 。管理者は、このデータを取得して、その後使用することができます。
注釈
キャッシュの使用: サーバーキャッシュまたはクライアントキャッシュを使用してレイヤーを編集するかどうかは、キャッシュの有効期限が切れるまでユーザーに対してデータが表示されないことを知りながら、そのことを行います。レイヤーを編集するためにキャッシュを有効にしないことをお勧めします。
地物のファイルとイメージの追加
プロジェクトに関連する media/upload フォルダを使用する
オンライン編集中に、各地物の画像を含むファイルをアップロードすることができます。これを達成するには、次の手順を実行する必要があります。
Configure edition for the layer, with one or more fields with the edit type
PhotoorFile. For example, let say the field name isphoto.QGISプロジェクトファイルのルートにフォルダを作成します
media/とサブフォルダmedia/upload(明らかにあなたは、あなたのコンピュータとサーバー側でローカルにそれを行う必要があります)。アップロードフォルダのWebサーバーユーザー(通常はwww-data) 書き込み権限 を与え、
media/uploadでファイルとフォルダを作成できるようにします。chmod 775 -R media/upload && chown :www-data -R media/upload
チェック
php.ini変数 ``post_max_size``と ``upload_max_filesize``が正しく設定されているかどうかを確認してください(デフォルトでは、PHPは最大2Mバイトまでのファイルのアップロードのみを許可します)
次に、Lizmap は、レイヤー名やフィールド名などに応じて、データを格納するフォルダを作成します。たとえば、ファイルはフォルダに格納されます。media/upload/PROJECT_NAME/LAYER_NAME/FIELD_NAME/FILE_NAME.EXT 、イメージ media/upload/environment/observations/species_picture/my_picture.png.
この画像(または他のファイル)は、メディアフォルダに保存されるので、地物情報に表示することができます。 地物情報表示での使用 を参照。
特定の保存先フォルダを使用する
デフォルトの保存先フォルダを上書きできます。 media/upload/PROJECT_NAME/LAYER_NAME/FIELD_NAME/FILE_NAME.EXT メディアを保存するパスを、プロジェクトに対して相対的に手動で設定します。これを行うには、 :guilabel:` 外部リソース ` フィールド編集ウィジェットを使用し、次の項目を設定する必要があります。
:guilabel:` デフォルトパス ` はプロジェクトに対して書き込まれます。例
../media/images/プロジェクトフォルダの横にあるフォルダメディアにこのフィールドファイルを保存する場合。プロジェクトメディアフォルダ内のパスを設定することもできます。例えば、media/my_target_folder/。デフォルトの :guilabel:` プロジェクトのパスに対して相対 ` オプションで、 :guilabel:` 相対パス ` チェックボックスをチェックします。
フィールドに画像を格納する場合は、 :guilabel:` 統合ドキュメントビューア ` チェックボックスをチェックし、タイプを :guilabel:` 画像 ` とする必要があります。
これにより、送信されたメディアファイルとイメージを、たとえば、ディレクトリ media をLizmapリポジトリフォルダと同じレベルに格納することができます。
media
イメージ < -- このフォルダにイメージを保存するには、
../media/images/pdf
環境
trees.qgs
trees.qgs.cfg
media
tree_pictures/ < -- このフォルダに画像を保存するには、
media/tree_pictures/を使用します。
Use a WebDAV remote storage
警告
This storage is not compatible with Lizmap Cloud  .
You must keep the Storage type with
 Select an existing file.
It is possible to store your files in a remote server that supports the WebDAV protocol (e.g. Nextcloud). To achieve this you must:
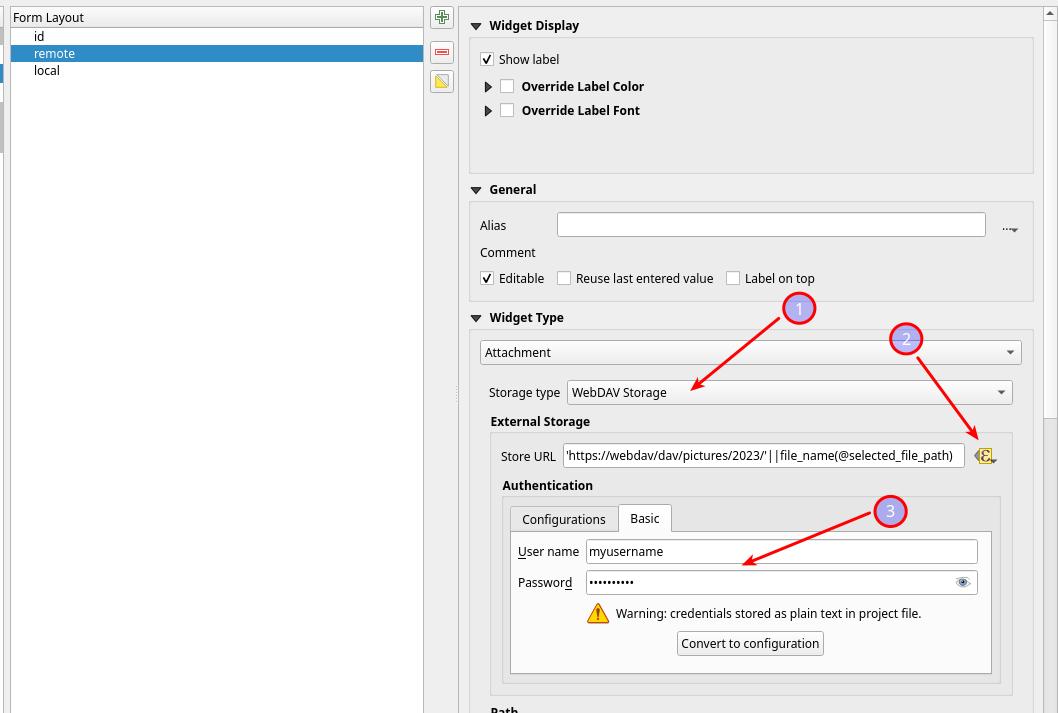
Configure the Attachments edit widget for the chosen field as follow:
In the Storage type field, select the WebDAV Storage option
In the External Storage` section, on the Store URL field, add an expression which indicates the full URL of the remote path for the file. The expression string must:
start with the remote storage URL of the root folder of the WebDAV server
include or not any destination subfolder
end with the
file_name(@selected_file_path)expression
Update the Authentication section with your
user nameandpassword(optional, read below about authentication)

For example, if you want to upload a file in your WebDAV server
https://webdav/davin the subfolderpictures/2024/then the full expression will be:'https://webdav/dav/pictures/2024/'||file_name(@selected_file_path)You can also upload a file directly in the root folder, simply change the expression above in
'https://webdav/dav/'||file_name(@selected_file_path)Tip
You can configure different fields on the same layer or in different layers to upload files to your remote storage under different subfolders.
Configure your Lizmap installation to recognize your WebDAV storage. To do so in your
var/config/profiles.ini.phpedit the[webdav:default]section:[webdav:default] baseUri=https://webdav/dav/ enabled=1 user=mywebdavuser password=mywebdavpassword
where:
baseUriis the root folder of your WebDAV server. It must end with/and it must be the same as indicated in the Attachment widgetenabledset it to1switch on the WebDAV configuration, or to0to switch it offuser, WebDAVbaseUriauthentication user, same as same as configured in the Authentication section of External storagepassword, WebDAVbaseUriauthentication password, same as above
注釈
userandpasswordfields are not mandatory, depends on how you intend to manage the WebDAV storage.注釈
Configure multiple WebDAV servers on the same Lizmap installation is not supported, so you can configure only one WebDAV endpoint per installation.
警告
To get files from remote storage the
baseUriwill be exposed on the web client.警告
If an user upload two files with the same name the first file could be overwritten. This behaviour cannot be controlled by Lizmap since it concerns the configuration and the structure of the WebDAV server.
Tip
To prevent files from being overwritten you can set the Store URL by placing a
uuidin front of the file name, for example:'https://webdav/dav/pictures/2024/'||uuid('WithoutBraces')||'_'||file_name(@selected_file_path)
After you had done the two configuration steps above you are able to:
upload a new file from the layer edition form
delete an existing file from the layer edition form
access the file via Attribute table (see Attribute table — Configure the attribute table and the vector selection)
access the file or get a preview of the file content via Popup (see 地物情報表示での使用)
