Popup
Activate popup
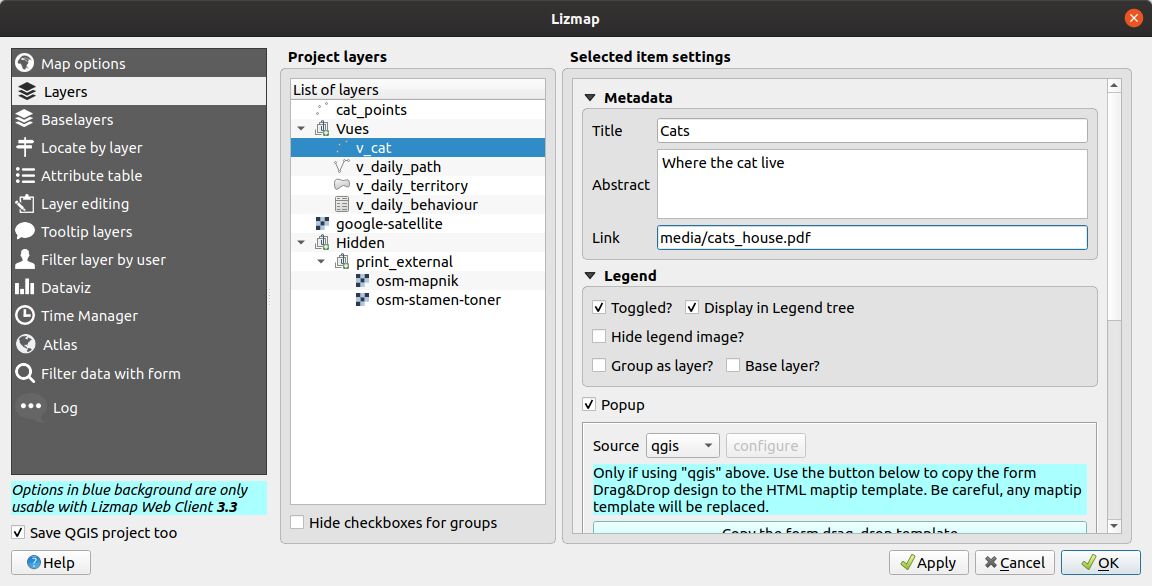
With the plugin, you can activate popups for a layer or for a group configured with the Group as layer option.
In the Layers tab, click on the Popup checkbox.

For the Group as layer option you must select the option for the group and for all the layers included you want to show in the popup: in this case, only the layers with the option Popup checked will be shown.
Existem três tipos de fontes popup:
Automatic, read Automatic popupLizmap HTML, read Lizmap HTML popupQGIS HTML Maptip, read QGIS HTML Maptip popupQGIS Drag&Drop form, read QGIS Drag&Drop Form popup
In Lizmap Web Client, a click on a feature will trigger the popup if (and only if):
the popup has been activated
through the plugin for the layer or the group
or the layer has edition capabilities for existing features
a camada estiver ativada na legenda, para que a mesma seja mostrada no mapa
o utilizador clicou numa área do mapa onde os dados da camada com popups ativas são apresentados.
Nota
For point layers you need to click in the middle of the point to display the popup. The tolerance can be setup in .
You can update where the popup is displayed in the web interface in . You can choose between:
dockminidockmapbottomdockright-dock
Geometry of the feature
See WMS for adding the geometry.
Media in popup
See Utilização de popups in the media chapter.
Automatic popup
The Lizmap Web Client Automatic popup displays a table showing the columns of the attribute table in two columns Field and Value, as shown below:
Campo |
Valor |
|---|---|
id |
1 |
nome |
Nome |
descrição |
Este objeto … |
foto |
:-) |
Pode modificar as informações apresentadas através do QGIS e também mostrar imagens ou links.
Configuração popup simples
Através do plugin, se clicar na caixa de verificação Ativar popups sem modificar seu conteúdo através do botão Configurar será apresentada a tabela padrão.
No entanto, pode sincronizar vários aspetos no QGIS e com a ajuda do plugin Lizmap para parametrizar os campos apresentados, renomear campos, e até mesmo apresentar imagens, fotos ou links para documentos internos ou externos.
Ocultar ou renomear uma coluna
Aviso
This is working only using Lizmap or Auto popup. The QGIS popup follows the QGIS maptip.
You need to use the tab in QGIS:
to hide a column in the popup, uncheck the corresponding WMS checkbox. The WMS column is on the right of the table. This will hide the field in QGIS Server from any WMS requests.
to rename a column, you should use the alias column. But to edit this column, add it from the tab .

Utilização de formatos média: imagens, documentos, etc.
If you want to use some media in your popup (pictures, PDF documents…) in your popup, you must use the Media directory.
For a given feature, using a path in your field starting by media/, Lizmap will display:
the image itself for jpeg or png files
the content for txt or HTML files
a link to any other file extension
Veja também
Chapter Media for more details on the usage of documents of the directory media in the popups.
Utilização de links externos
Também pode utilizar, num campo, links web completos para uma página ou imagem específica:
a imagem referida será apresentada, em vez do link
o link web será mostrado de forma clicável
Lizmap HTML popup
Introdução
If the simple table display does not suit your needs, you can write a popup template. To do so, you should know some HTML format. See e.g.: https://www.w3schools.com/html/
Aviso
When you use the Lizmap HTML mode, the previous configuration to rename a field does not work anymore: you have to configure what is displayed and how through the template. Managing media is also possible, but you have to configure it as well.
Implementação
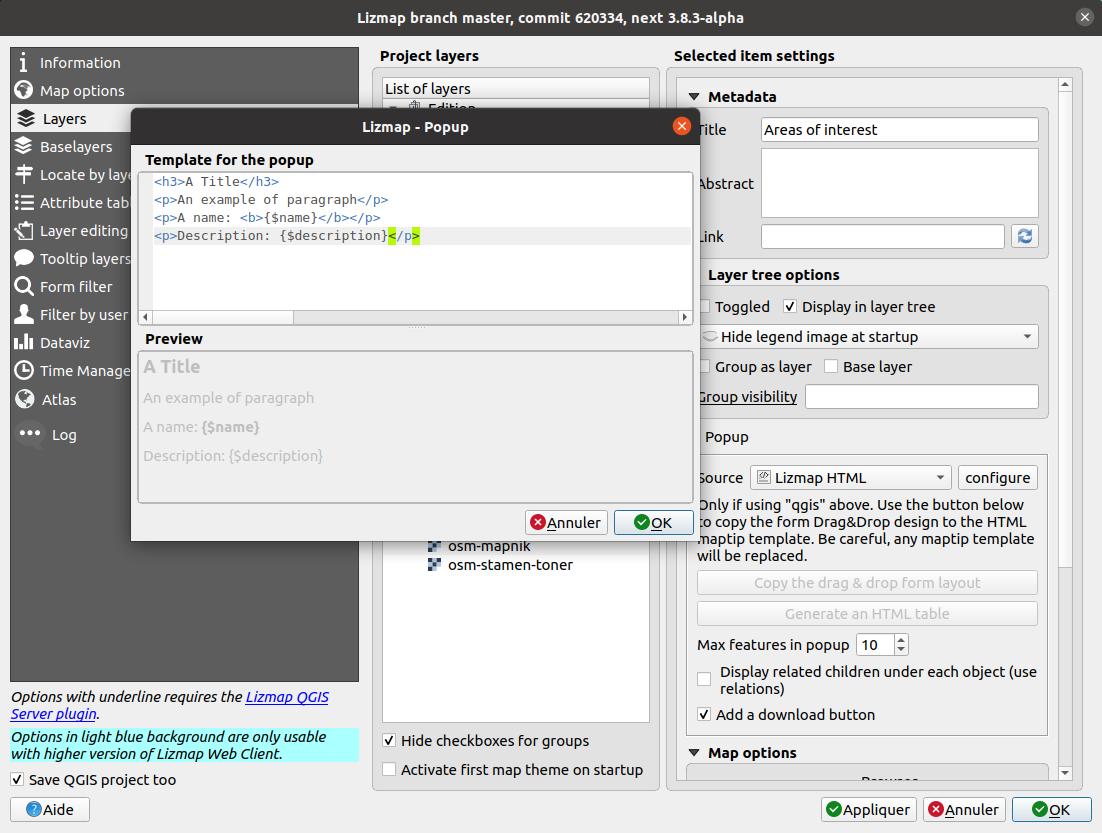
Pode editar o modelo popup com o botão Configurar no plugin Lizmap. Clicando no mesmo, será apresentada uma janela com duas áreas de texto:
uma área onde pode digitar o seu texto
uma área apenas de leitura, mostrando uma visualização prévia do seu modelo

Pode digitar texto simples, mas sugerimos que escreva em formato HTML para dar uma formatação adequada. Por exemplo, pode adicionar parágrafos, cabeçalhos, etc .:
<h3>A Title</h3>
<p>An example of paragraph</p>
O comportamento é o seguinte:
se o conteúdo das duas áreas estiver vazio, será apresentada uma tabela simples na popup (modelo padrão)
se o conteúdo não estiver vazio, o seu conteúdo será utilizado como um modelo para a popup
Lizmap Web Client will replace automatically a variable, identified by the name of a field, with its content. To add the content of a column to a popup, you should use the name of the column precede by a dollar sign ($), all surrounded by curly brackets ({}).
For instance:
<h3>A Title</h3>
<p>An example of paragraph</p>
<p>A name: <b>{$name}</b></p>
<p>Description: {$description}</p>
Nota
Se configurou um alias para um campo, deve utilizar esse alias em vez do nome, entre parênteses retos
Também pode utilizar os valores das colunas como parâmetros para atribuir estilo ao texto. Como exemplo, para utilizar a cor de uma linha de autocarro como uma cor de fundo:
<p style="background-color:{$color}">
<b>LINE</b> : {$ref} - {$name}
<p/>
Utilização de média e links externos
Pode utilizar o recurso média referido no conteúdo da tabela, mesmo se utilizar um modelo. Para fazer isso, deve utilizar a coluna de média, tendo em conta o fato de que o Lizmap Web Client substitui automaticamente o caminho relativo do tipo /media/myfile.jpg pelo URL completo do ficheiro, acessível através da interface web.
Também pode utilizar URLs completos apontando para as páginas ou imagens alojadas noutro servidor.
Um exemplo de um modelo de manipulação de média e um link externo:
 <p style="font-size:0.8em;">A Title</p>
 <p>The name is {$name}</p>
<p>
   A sample image<br/>
   <img src="{$image_column}" style="">
 </p>

 <p><a href="{$website}" target="_blank">Web link</a></p>

 <p><img src="https://www.3liz.com/images/logo-lizmap.png"/></p>
Veja também
Chapter Media for more details on the use of documents in the directory media.
QGIS Drag&Drop Form popup
If you have defined a form layout with the Drag and drop form designer for a layer in , you can also display it in its popup. See the QGIS documentation about Drag and Drop form.
The QGIS Form, designed for HTML, is displayed in the popup directly. You can’t alter the popup on runtime.
Tabs defined in the Form Layout in QGIS will also be displayed as HTML tabs in the popup.
If you want to alter the popup HTML, then you must use QGIS Popup instead of Form Popup.
QGIS HTML Maptip popup
QGIS popups can be configured via . The main advantages of this approach are:
HTML is used
pode utilizar variáveis e expressões QGIS, adicionando informações criadas dinamicamente
the popup can be previewed in QGIS, using map tips. You can enable map tips in the menu
as configurações popup e estilo das camada são armazenados no projeto QGIS, para que possam ser reutilizados em outros projetos Lizmap sem replicar a configuração.
Similar to QGIS Drag&Drop Form popup, you have a Drag and drop form designer for a layer, you can click on the Copy the drag and drop designer button. This will erase any existing maptip set on the layer and will generate the QGIS Expression matching the form layout.
To have a similar popup as the auto one, you need to click the button in the Lizmap plugin .
To display some color with HTML according to the value of a field, you can use this QGIS expression above :
<p style="color:[% if("POPULATION" > 5000, 'red', 'black') %]">[% POPULATION %]</p>
Link to a PDF QGIS layout
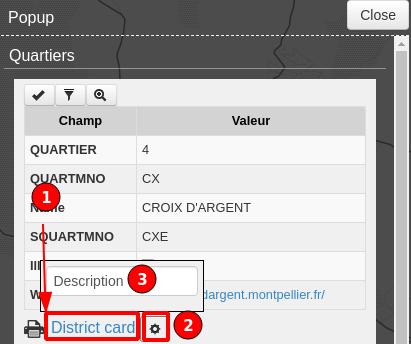
Every feature of a layer with an atlas configured will have a link (1) at the end of its popup which open a PDF for this specific feature, using the QGIS Atlas layout. If the layout contains custom text fields, a button (2) will be displayed. Clicking this button, allows you to type values for those custom text fields before printing. To enable this feature, you need a QGIS Layout with atlas enabled on that layer and to download the AtlasPrint QGIS Server plugin on GitHub : https://github.com/3liz/qgis-atlasprint

Relações de um para vários
It is possible to display multiple objects (photos, documents) for each geographical feature. To do so, you have to configure both the QGIS project and the Lizmap config.
No projeto QGIS:
Use 2 separate layers to store the main features and the pictures. For example trees and tree_pictures. The child layer must contain a field referencing the parent layer id.
Configure aliases and field types in . Use Photo for the field which will contains the relative path to pictures.
Add a relation in QGIS project properties between the main layer trees and the child layer tree_pictures in .
Add data to the layers. You should use relative path to store the pictures path. Theses paths must refer to a project media subdirectory, for example: media/photos/feature_1_a.jpg
No plugin Lizmap:
In the Layers tab, activate popup for both layers. You can configure source of the popup if you need specific layouts
For the parent layer, activate the option Display relative children under each object (use relations)
Optionally, add the two layers in the Attribute table tab
Optionally, you can activate editing for the two layers, to allow the web users to create new features and upload pictures
Guarde e publique seu projeto com a configuração do Lizmap
In Lizmap Web Client:

If relative children popup are defined as Automatic, this button will be visible in the feature’s popup at the top of related objects.
Click it to compact all related objects in one table with search, sort and paging capabilities.
Mostrar subordinados em formato compacto
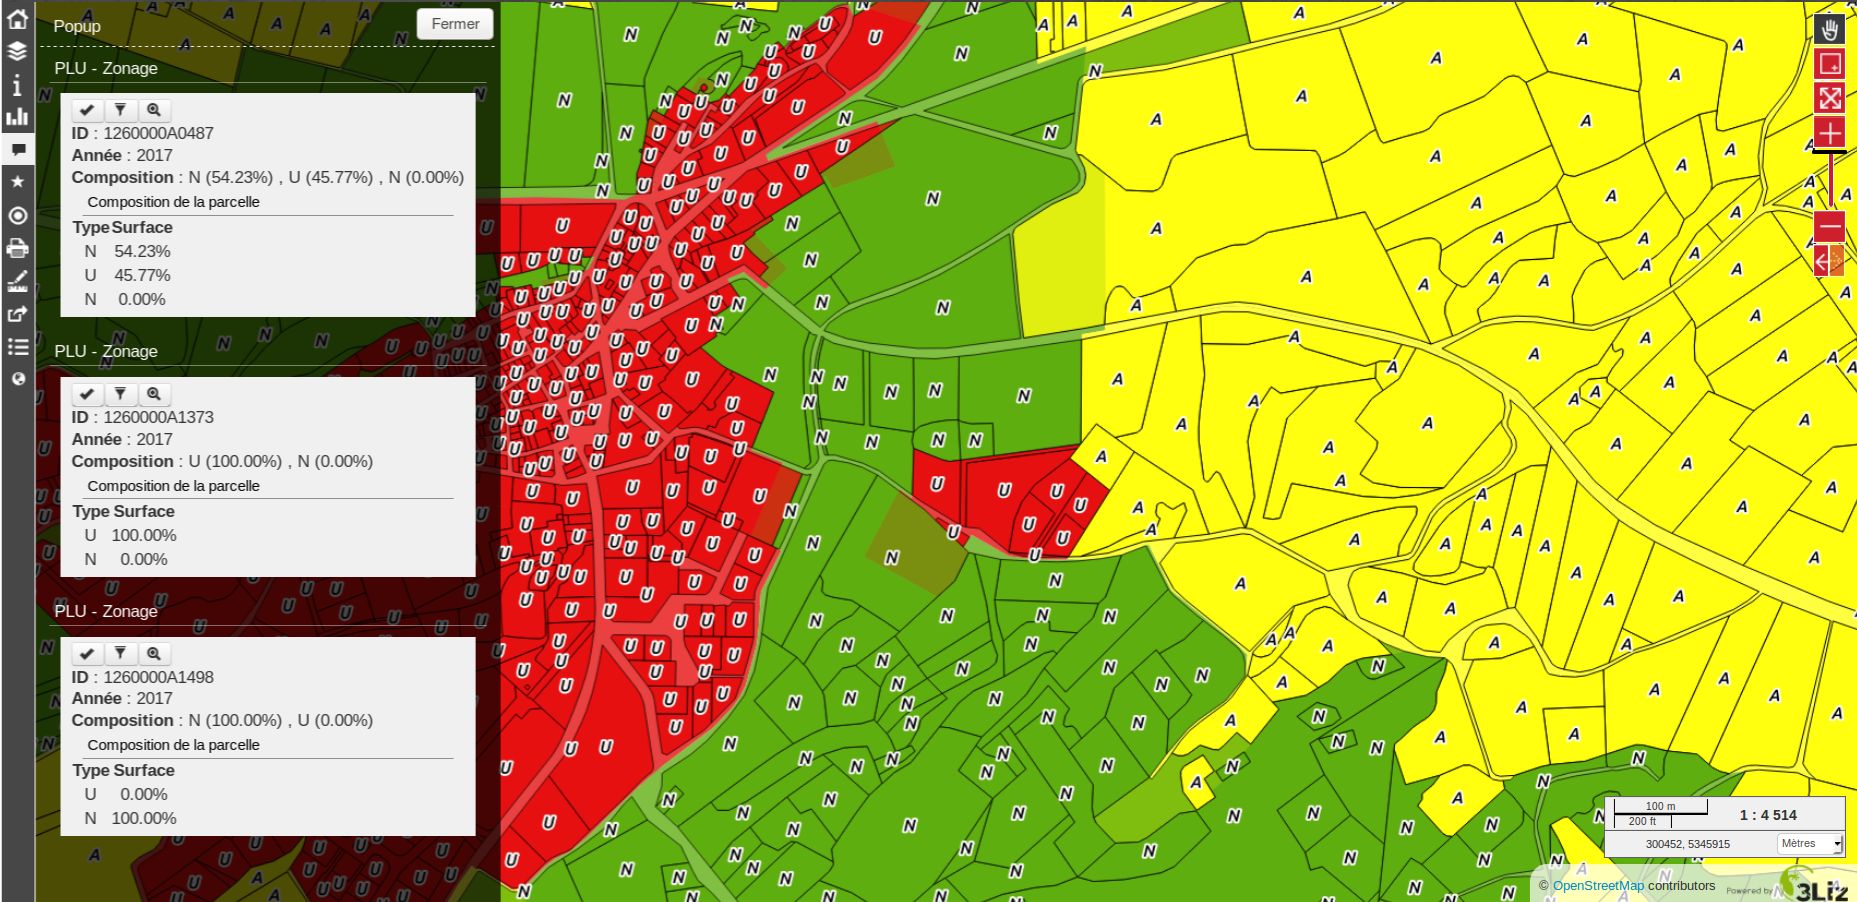
É possível altera a forma como os elementos subordinados são apresentados e fazê-las parecer uma tabela. Para isso, é necessário adaptar o HTML de camada subordinada e utilizar algumas classes para manipulação do código.
«lizmap_merged»: É necessário atribuir esta classe à tabela
lizmapPopupHeader: Se desejar uma apresentação melhorada dos cabeçalhos, é necessário colocar esta classe no “<tr>” que os contém
lizmapPopupHidden: Esta classe permite ocultar alguns dos elementos subordinados que se pretendem ocultar quando utilizados como subordinados embora sendo ainda possível visualizá-los se se apresentar a popup como uma Popup principal
Aqui está um exemplo:
<table class="lizmap_merged">
 <tr class="lizmapPopupHeader">
     <th class="lizmapPopupHidden"><center> Idu </center></th>
     <th> <center> Type </center> </th>
     <th> <center> Surface</center> </th>
  </tr>
  <tr>
     <td class="lizmapPopupHidden"><center>[% "idu" %]</center></td>
     <td><center>[% "typezone" %]</center></td>
     <td><center>[% "surface" %]</center></td>
  </tr>
</table>

Permalink with a popup
See the chapter permalink.
