印刷/ファイル出力
lizmapでユーザーがリアルタイムで定義したExtent
To add print capabilities in the online map, you have to create at least one print layout without atlas enabled. Then you will find the list of your layouts in the Layouts plugin tab. They are enabled by default but you can disable it or set permissions for groups.
注釈
Printing will respect the feature filters and selections.
レイアウトの作成
レイアウトでは、次の項目を追加できます。
マップ、地図帳 なし が有効
北向き矢印への画像
組織のロゴの画像
すべての印刷に関して修正される凡例
ラベル
- スケール
どちらか :guilabel:` 数値 `
または、スケール バーの位置を調整するために、正しい参照アンカー ポイントを使用して :guilabel:` Fit segment width ` を設定します。
A location map, a map for which you have enabled and configured the function of Overview, read 概要マップの作成
Since QGIS 3, you can use QGIS expressions, in your labels for instance. You can create automatic source label according to visible layers following this example on the QGIS documentation.
動的コンテンツ
You can allow the user to modify the contents of certain labels (title, description, comment, etc). To do this, you need to add an identifier to your label in the layout.
警告
Each identifier must be unique for the whole layout. Identifiers must be strings, without integers or spaces
(e.g. it must be custom_title, nor 1 neither custom title).
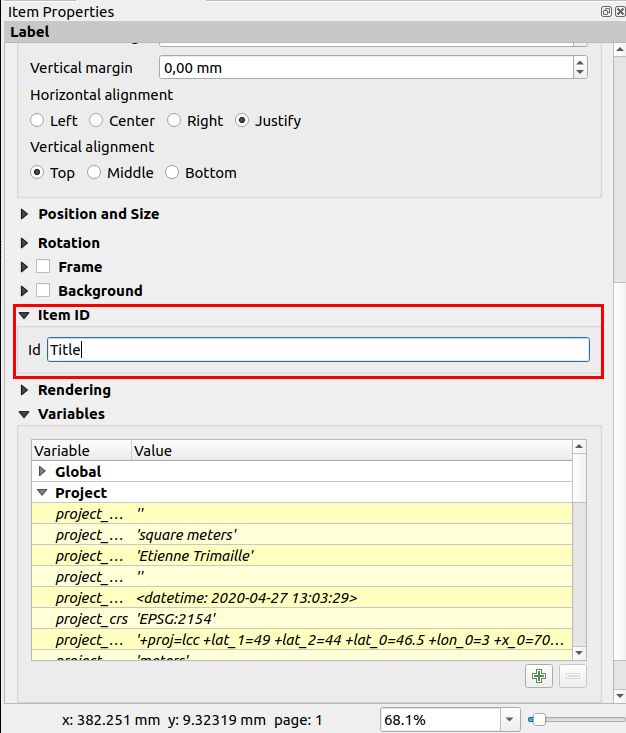
Lizmap will automatically ask the user in the web-browser to fill each fields.
Tip
If your label is pre-populated in QGIS, the field will be pre-populated too in the web-browser.
If you check 'Render as HTML' for your label in QGIS, you will have a multiline label in Lizmap accepting HTML code. But you will need to
<br>for line breaks.
The preview in Lizmap will be similar to this screenshot. The light rectangle is the area the user can define in the web browser. The user can also set the map description and title.

縮尺
印刷機能は、プラグイン Map (Map options — The general options of the map) で設定した縮尺に基づいています。
地図帳を使用する場合の地物情報によるレイアウト
Read in the popup chapter, Link to a PDF layout using the QGIS Atlas
Allow printing of external baselayers
警告
This section is now deprecated. You should use the baselayers group provided by the plugin.
The Lizmap plugin Baselayers tab allows you to select and add external baselayers (Base layers — Layers used for the background of the map). These external baselayers are not part of the QGIS project, default print function does not integrate them.
To overcome this lack Lizmap offers an easy way to print a group or layer instead of the external baselayer. To be able to print a layer which is visible in Lizmap Web Client only:
You need to add the equivalent layer in the QGIS project.
You need to hide it from the Lizmap legend, see 個々のレイヤーの非表示.
Rename the layer to one of these names:
osm-mapnikfor OpenStreetMaposm-stamen-tonerfor OSM Stamen Tonerosm-cyclemapfor OSM CycleMapopen-topo-mapfor OpenTopoMapgoogle-satellitefor Google Satellitegoogle-hybridfor Google Hybridgoogle-terrainfor Google Terraingoogle-streetfor Google Streetsbing-roadfor Bing Roadbing-aerialfor Bing Aerialbing-hybridfor Bing Hybridign-scanfor IGN Scanign-planfor IGN Planign-photofor IGN Photosign-cadastralfor IGN Cadastre
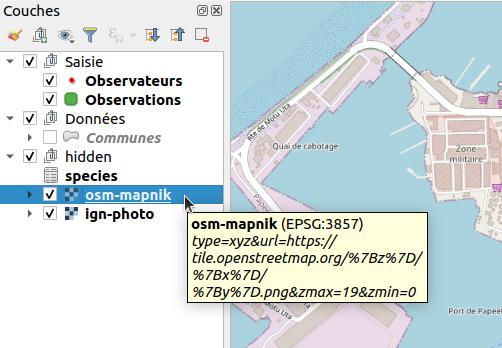
In the screenshot above, we can notice the `osm-mapnik` layer in the `hidden` group, which is a TMS layer using https://tiles.openstreetmap.org.
注釈
The use of this method must be in compliance with the licensing of external baselayers used (Base layers — Layers used for the background of the map).
警告
If it's not working, check that your server is able to access to the internet. These base layers are provided
online only.
Some proxy or firewalls might block some requests to the internet. If your server is behind a proxy, check that
QGIS Server is configured with the proxy settings (using the file QGIS3.ini and the section [proxy]).
Refer to the QGIS Server documentation for these settings.
To add these layers, you can use existing WMS/WMTS services, XYZ providers (with QuickMapServices), local files...
For IGN baselayers, you can use IGN's WMS or WMTS url. The key used for this url need to be protected by referer and IP.
In referer, you have to indicate your projects page's URL like this : .*your-url.fr.*. In IP, you have to indicate
your Lizmap server's IP and your computer's IP (to open IGN's WMS url in QGIS on your computer). Both IP addresses must
be separated by a comma. Beware, if you use IGN WMS or WMTS layers, QGIS project's EPSG code should be 3857.
レイアウトに独自の画像を追加する
レイアウトにカスタム イメージ、たとえば、カスタムの方位記号や組織のロゴなど を追加する場合、サーバーはこれらのイメージにもアクセスする必要があります。
Either use an image with an URL
http://so that your image is accessible on both your local computer and on the server.Or use QGIS expression to build a compatible path on both desktop and server (it should work out of the box, but in case it's not working, you can use an expression.) :
イメージを
mediaディレクトリに置きます ( メディア を参照してください)、これは必須ではありません。QGIS 表現
@project_home || '/media/organization_logo.png'。Windows を使用している場合でもスラッシュを使用します。