Advanced Configuration
Creare una mappa di inquadramento
Per aggiungere una mappa di inquadramento, o mappa di localizzazione, all’interno della mappa di Lizmap, è necessario:
Create an independent group in the QGIS project called Overview (with the 1st letter capitalized)
Add layers, ad esempio il livello relativo ai limiti amministrativi, una cartografia di base semplificata, ecc.
All layers and groups in the Overview group will not be shown in the lizmap’s map legend. They are drawn only in the Overview map.
Si consiglia di utilizzare:
livelli vettoriali leggeri e semplificati (dove necessario)
usare una simbologia adatta: linee sottili e semplici o etichette nascoste
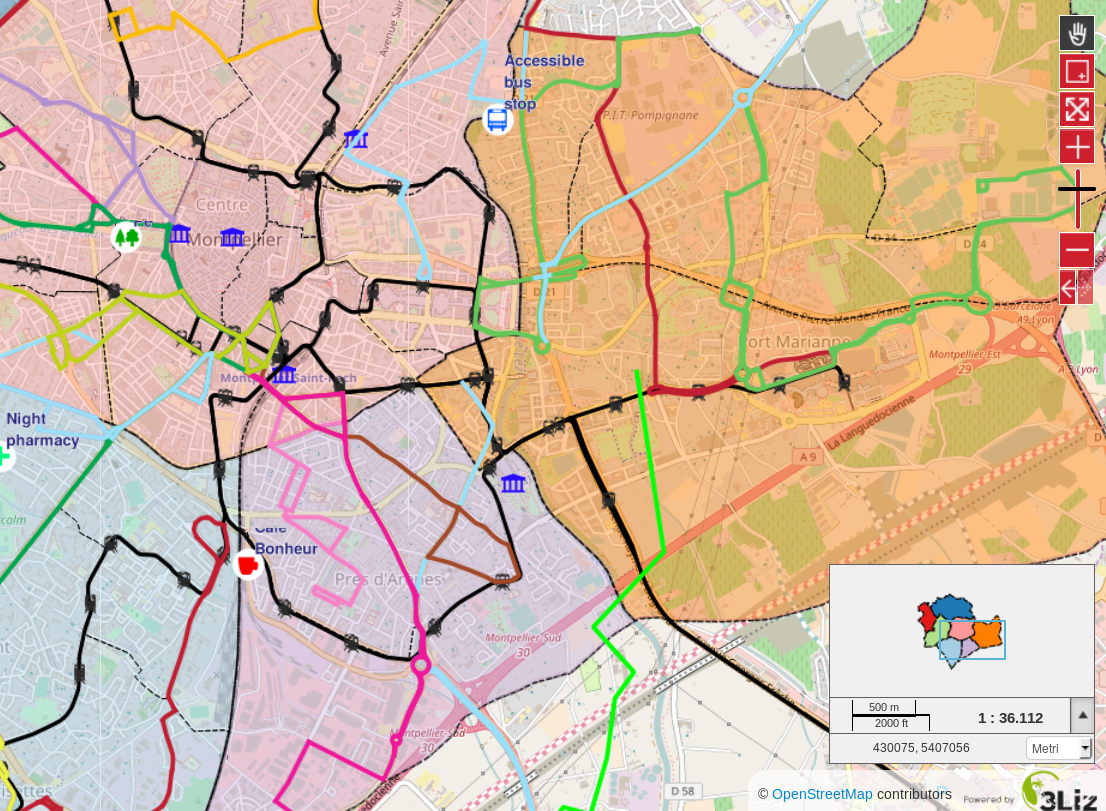
Di seguito un esempio di utilizzo:
Add the localization function
La finalità di questo strumento è quella di offrire all’utente del Client Web di Lizmap un menu a tendina che permette di zoomare su uno o più oggetti spaziali all’interno del layer
Caso d’uso
Si consideri un livello vettoriale limiti amministrativi contenuto nel progetto QGIS. Scegliamo di aggiungere il livello limiti amministrativi nello strumento Locate by layer, al fine di permettere all’utente del Client Web di Lizmap di posizionarsi rapidamente ad esempio in uno specifico comune.
Una volta che questo layer è stato aggiunto nello strumento Locate by layer, nell’interfaccia Web di Lizmap appare un menu a tendina contenente i limiti amministrativi.
Nel momento nel quale un utente del Web Gis seleziona un elemento di questa lista, la mappa viene automaticamente centrata sull’elemento selezionato del quale viene mostrata la geometria (opzionale).
Prerequisiti
Nota
The layer(s) you want to use must be published as WFS layer: check the corresponding box of the WFS capabilities in the OWS Server tab of the Project Properties window.
How to
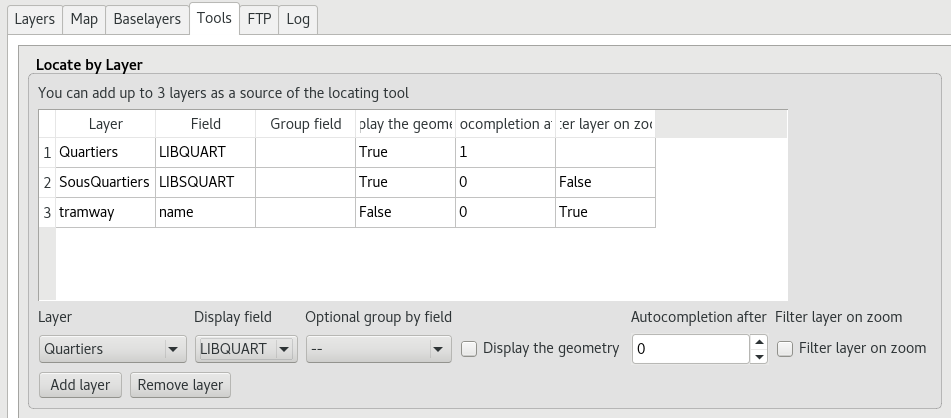
Per aggiungere un livello in questo strumento:
chose the layer attraverso il primo menu a tendina dalla lista dei livelli vettoriali del progetto
poi il campo che contiene l’etichetta che si desidera visualizzare nel menu a tendina
Se si desidera che la geometria dell’oggetto selezionato sia visualizzata all’interno della mappa quando l’utente sceglie un elemento dalla lista, selezionare l’opzione Display the geometry
finally click the button Add layer to add it to the list.
To remove a layer already configured:
select the line of the layer you want to remote by clicking on it
click on the button Remove layer.
Elenchi Gerarchici
Se prendiamo l’esempio dei limiti amministrativi provinciali, può essere interessante fornire all’utente anche un menu a tendina che contiene i limiti amministrativi comunali. E” auspicabile che quando l’utente sceglie una determinata provincia, il menu a tendina sia automaticamente filtrato per visualizzare solo i comuni della provincia prescelta.
Per fare questo ci sono due strade:
sono disponibili i 2 strati vettoriali separati: uno per le provincie e uno per i comuni. In questo caso è necessario utilizzare un field join tra i due strati per consentire il filtraggio automatico delle liste in Lizmap
oppure è diponibile solouno strato per i comuni. In questo caso nel plugin è possibile specificare un campo di raggruppamento. Nell’applicazione WEB saranno creati due menu a tendina al posto di uno.
Nota
Up to 3 project layers can be added to the Locate by layer tool.
Nota
Don’t forget to check if your configuration of Qgis server is the right one (in Lizmap : My account -> Lizmap configuration -> check if the qgis server version is the right one, if not, you can use the button “modify” below). If the configuration is not right the location will be wrong!
Spatial searching
In the map options, you can activate and configure the address search bar, based on external web services (nominatim, google or french IGN). See Configure the map . Additonaly, you can add spatial searching capability to Lizmap. This means you will allow the users to search within spatial data, such as countries, points of interests, etc. You have two ways to add searching capability in Lizmap:
since version 3.1, you can use the plugin QuickFinder to configure a data search per QGIS project.
since version 3.2, you can create a table or view lizmap_search in your PostgreSQL database to store the search data for all your Lizmap projects.
QuickFinder Plugin
The purpose of this plugin is to provide fast searching among big datasets, searching in a qtfs file generated by QGIS Desktop.
Prerequisiti
You must have install at least the 7.x version of PHP in your Lizmap server.
It is available only since version 3.1 of Lizmap Web Client.
Configuration
Inside QGIS:
install QuickFinder Plugin
choose a layer(s), define the fields to search among, pick the geometry storage format (WKT or Extent) and store Full Text Searchs (FTS) vector into a file database (.qfts). The filename must be identical to the QGIS project filename. Ex: myproject.qfts for a QGIS project stored as myproject.qgs
Nota
Only WKT or Extent formats for geometry storage are working, since binary format (WKB) can not be decoded by LWC.
Inside LWC (available since version 3.1):
put the database file beside the QGIS project, use the Search tool (input) and zoom to the chosen feature.
PostgreSQL search
When you have many projects and data, the best solution to provide searching capabilities is to set up a dedicated relation (table or view) inside your database. Since version 3.2, Lizmap allows to use a PostgreSQL database to store the search data.
Prerequisiti
a PostgreSQL database, accessible from Lizmap Web Client
PostgreSQL extensions activated in this database : unaccent and pg_trgm (for effective LIKE queries)
A custom function f_unaccent which can be used in an index. See this Stack Overflow post for explanation
-- Add the extension pg_trgm
CREATE EXTENSION IF NOT EXISTS pg_trgm;

-- Add the extension unaccent, available with PostgreSQL contrib tools. This is needed to provide searches which are not sensitive to accentuated characters.
CREATE EXTENSION IF NOT EXISTS unaccent;

-- Add the f_unaccent function to be used in the index
CREATE OR REPLACE FUNCTION public.f_unaccent(text)
RETURNS text AS
$func$
SELECT public.unaccent('public.unaccent', $1)  -- schema-qualify function and dictionary
$func$ LANGUAGE sql IMMUTABLE;
Nota
We choose to use the pg_trgm extension and this custom f_unaccent function instead of the Full Text Search (FTS) tool of PostgreSQL, to keep the tool as simple as possible and avoid the need to create FTS «vectors» in your search data.
Create the lizmap_search table or view
The database admin must create a table, view or materialized view called lizmap_search. This relation must be accessible in the search_path (you can put it in the public schema, or configure the search_path variable for the database or the user which connects to the database).
The relation «lizmap_search» must contain the following columns:
item_layer (text). Name of the layer. For example «Countries»
item_label (text). Label to display the results, which is the data to search among. Ex: «France» or «John Doe - Australia». You can build it from a concatenation of several fields values.
item_project (text). List of Lizmap projects separated by commas. Optionnal. When set, the search will be done only for the specified Lizmap projects
item_filter (text). Username or group name. When given, the results will be filtered by authenticated user login and groups. For example, “admins”
geom (geometry). We advise to store all the geometries with the same SRID.
Here is an example of SQL code you can use, to add data from two different spatial tables into lizmap_search (here as a materialized view to ease further maintenance)
DROP MATERIALIZED VIEW IF EXISTS lizmap_search;
CREATE MATERIALIZED VIEW lizmap_search AS
SELECT
    'Commune' AS item_layer, -- name of the layer presented to the user
    concat(idu, ' - ', tex2) AS item_label, -- the search label is a concatenation between the 'Commune' code (idu) and its name (tex2)
    NULL AS item_filter, -- the data will be searchable for every Lizmap user
    NULL AS item_project, -- the data will be searchable for every Lizmap maps (published QGIS projects)
    geom -- geometry of the 'Commune'. You could also use a simplified version, for example: ST_Envelope(geom) AS geom
FROM cadastre.geo_commune
UNION ALL -- combine the data between the 'Commune' (above) and the 'Parcelles' (below) tables
SELECT
    'Parcelles' AS item_layer,
    concat(code, ' - ', proprietaire) AS item_label,
    'admins' AS item_filter, -- only users in the admins Lizmap group will be able to search among the 'Parcelles'
    'cadastre,urban' AS item_project, -- the Parcelles will be available in search only for the cadastre.qgs and urban.qgs QGIS projects
    geom
FROM cadastre.parcelle_info
;
Optimisation
You should use a table, or a materialized view, on which you can add indexes to speed up the search queries.
We strongly advise you to add a trigram index on the unaccentuated item_label field, to speed up the search query:
-- Create the index on the unaccentuated item_label column:
DROP INDEX IF EXISTS lizmap_search_idx;
CREATE INDEX lizmap_search_idx ON lizmap_search USING GIN (f_unaccent(item_label) gin_trgm_ops);

-- You can refresh the materialized view at any time (for example in a cron job) with:
REFRESH MATERIALIZED VIEW lizmap_search;
At present, Lizmap PostgreSQL search cannot use 3D geometries, or geometries with Z or M values. You have to use the ST_Force2D(geom) function to convert geometries into 2D geometries.
Configure access
Once this table (or view, or materialized view) is created in your database, you need to check that Lizmap can have a read access on it.
If your Lizmap instance uses PostgreSQL to store the users, groups and rights, a connection profile already exists for your database. Then you can just add the lizmap_search relation inside this database (in the public schema).
If not, or if you need to put the search data in another database (or connect with another PostgreSQL user), you need to add a new database connection profile in Lizmap configuration file lizmap/var/config/profiles.ini.php. The new profile is a new jdb prefixed section, called jdb:search. For example, add the following section (please replace the DATABASE_ variables by the correct values):
[jdb:search]
driver="pgsql"
database=DATABASE_NAME
host=DATABASE_HOST
user=DATABASE_USER
password=DATABASE_PASSWORD
; search_path=DATABASE_SCHEMA_WITH_LIZMAP_SEARCH,public
You don’t need to configure the locate by layer tool. You can now use the default search bar in lizmap.

Media in Lizmap
Use principle
E” possibile pubblicare i documenti attraverso Lizmap. Per fare questo è sufficiente:
create a directory called media (in lower case and without accents) at the same level as the QGIS project
place documents in it: pictures, reports, pdfs, videos, HTML or text files
the documents contained in this media directory must be synchronized as other data
you can use subdirectories per layer or theme: the organization of media directory content is free.
Attraverso il Web Client di Lizmap è possibile accedere a questi documenti in due modi:
the popups: the content of one or more field for each geometry can specify the path to the media. For example a photo or pdf field
the link provided for each group or layer in the Lizmap plugin Layers tab.
Di seguito il dettaglio degli usi possibili.
Uso per links
It is possible to use a relative path to a document for layers or groups link.
Nota
Links can be filled with the Lizmap plugin Layers tab after selecting the layer or group. See Configure your layers for the Web
Il percorso deve essere scritto:
starting with media/
with slashes / and not backslashes
Qualche esempio:
media/my_layer/metadata_layer.pdf
media/reports/my_report_on_the_layer.doc
media/a_picture.png
Nella mappa del Web Client di Lizmap, se il link è stato applicato in questo modo ad uno dei livelli, un’icona (i) apparirà alla destra del nome del livello. Cliccando su questa icona si aprirà il documento collegato in una nuova scheda del browser.
Uso nel pop-up
Regola
Come descritto nell’introduzione, è possibile utilizzare a media path all’interno dei dati del livello cartografico.
Ad esempio, se si desidera che lo strumento associ un’immagine specifica per ogni oggetto geografico, è necessario creare un nuovo campo attributi che contenga il percorso dell’immagine in ogni record della tabella attributi del livello, quindi attivare il pop-up per questo livello.
Esempio
Here for example the attribute table of a layer landscape configured to display pictures in the popup. The user has created a picture field in which he places the path to the pictures, and a pdf field in which he puts the paths to a pdf file describing the object corresponding to each line.
id |
name |
description |
picture |
|
|---|---|---|---|---|
1 |
Marsh |
blabla |
media/photos/photo_1.png |
media/docs/paysage-1.pdf |
2 |
Beach |
blibli |
media/photos/photo_2.png |
media/docs/paysage-2.pdf |
3 |
Moor |
bloblo |
media/photos/photo_3.png |
media/docs/paysage-3.pdf |
Nota
In this example, we see that the pictures and pdf file names are normalized. Please follow this example because it allows using the QGIS Field Calculator to create or update automatically the media column data for the entire layer.
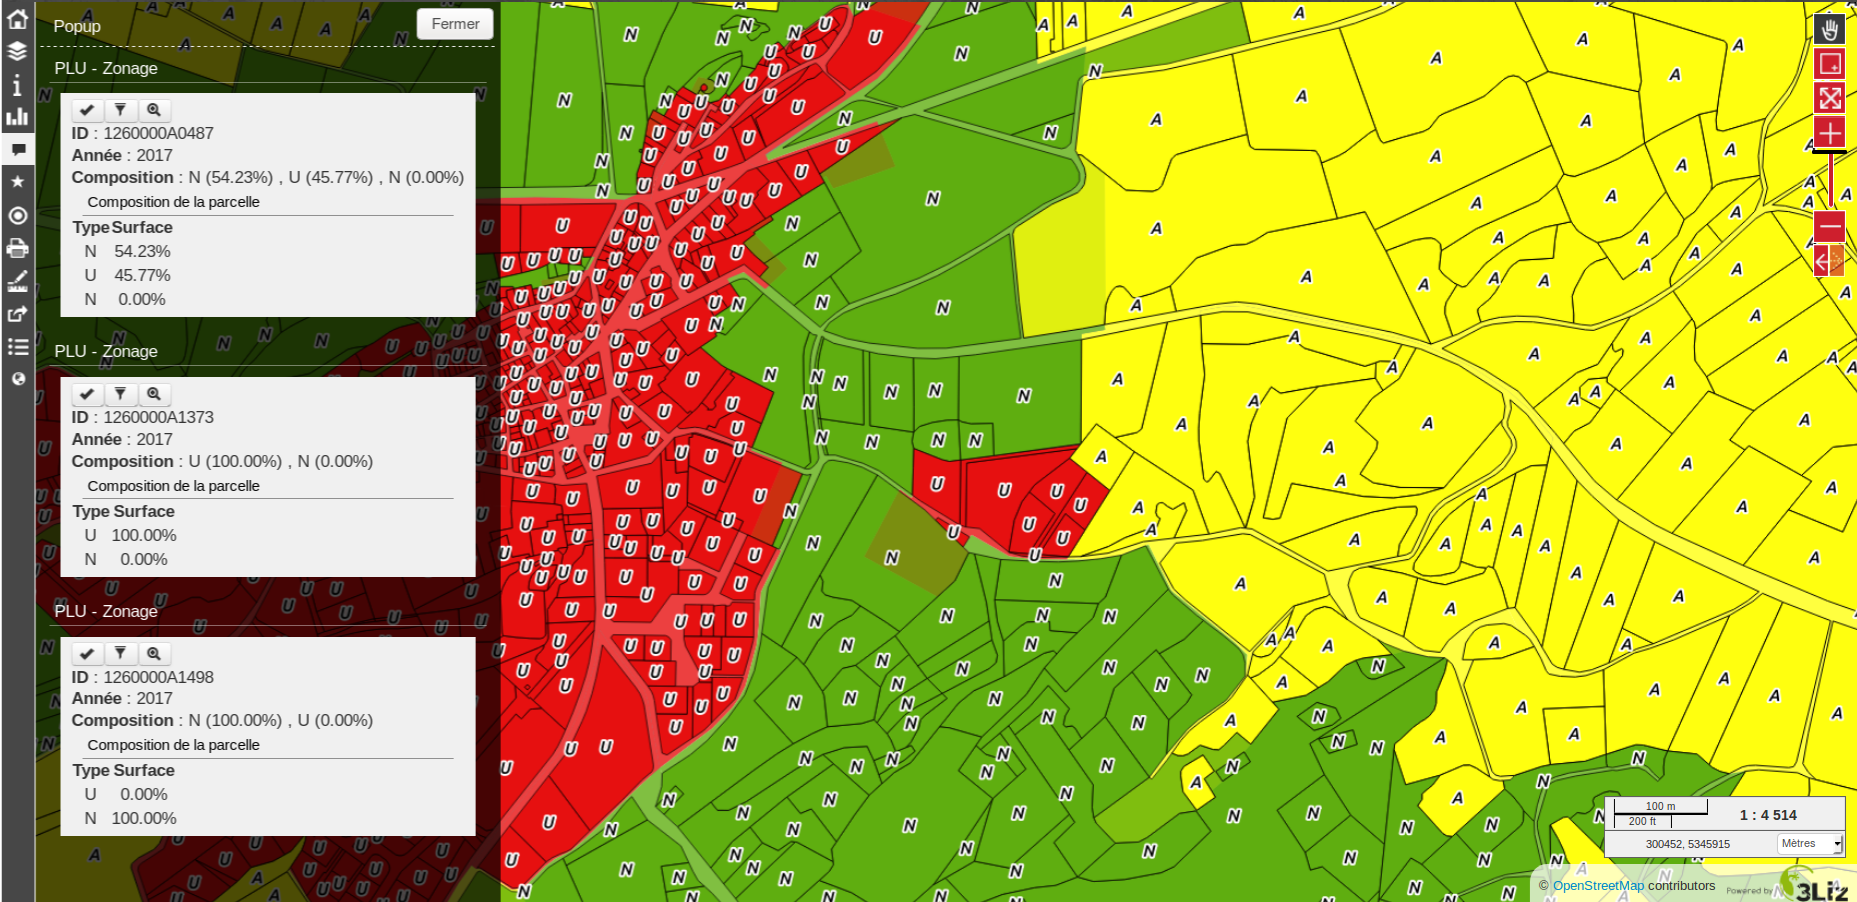
Result
Here are the display rules in the popup:
if the path points to a picture, the image will be displayed in the popup. Clicking on the picture will display the original image in a new tab
if the path points to a text file or HTML file, the file contents will be displayed in the popup
for other file types, the popup will display a link to the document that users can download by clicking on the link.
Illustration
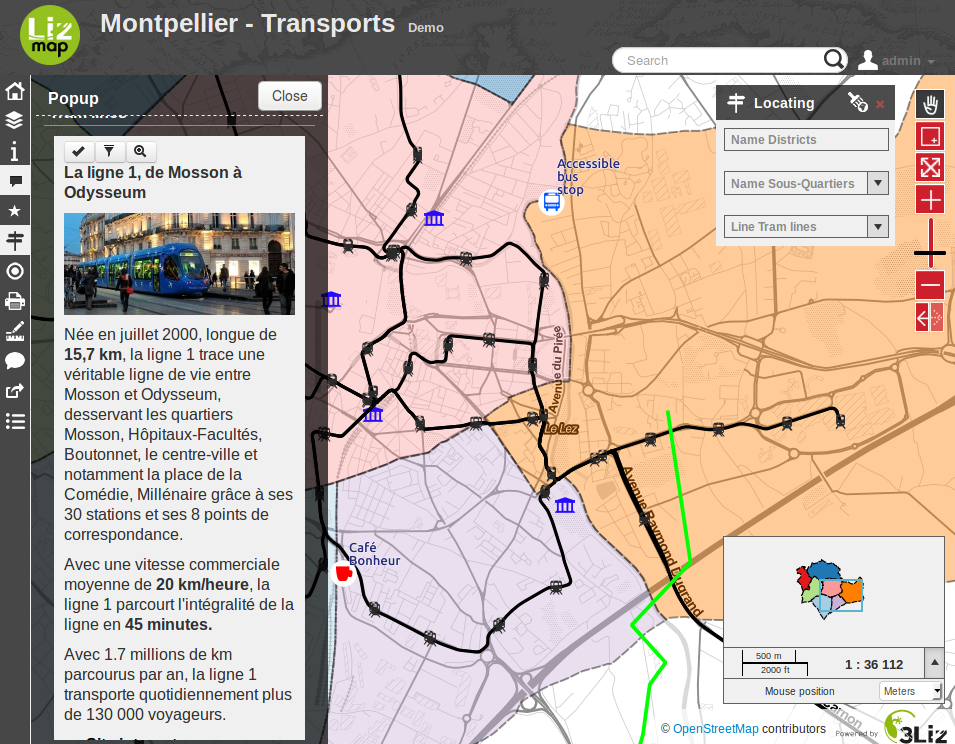
Below is an illustration of a Lizmap popup displaying a picture, a text and a link in the popup:
How to configure popups
Activate popups
With the plugin, you can activate popups for a single layer or for a group configured with the «Group as layer» option.
Just click on the checkbox Activate popups of the tab Layers on the Lizmap plugin interface. For the Group as layer option you must select the option for the group and for all the layers included you want to show in the popup: in this case, only the layers with the option Popup checked will be shown.
Esistono tre tipi di fonti per i popup:
auto
lizmap
qgis
In the web application Lizmap Web Client, a click on a map object will trigger the popup if (and only if):
il layer è attivo nella legenda, cosicché è mostrato nella mappa
the popup has been activated through the plugin for the layer or the group
the user has clicked on an area of the canvas where data for the layer with active popups are displayed.
Nota
For point layers you need to click in the middle of the point to display the popup. The tolerance can be setup in tab Map options then Map tools.
You can update where the popup is displayed in the web interface in Map options then Map interface. You can choose between:
dock
minidock
map
bottomdock
right-dock
Auto popup
The Lizmap Web Client auto popup displays a table showing the columns of the attribute table in two columns Field and Value, as shown below:
Campo |
Valore |
|---|---|
id |
1 |
name |
Un nome |
description |
Questo oggetto … |
foto |
:-) |
You can modify the info displayed through QGIS, and also display pictures or links.
Configurazione popup semplice
With the plugin, if you click on the checkbox Activate popups without modifying its content through the button Configure the default table is shown.
Nevertheless, you can tune several things in QGIS and with the help of Lizmap plugin to parametrize the fields displayed, rename fields, and even display images, photos, or links to internal or external documents.
Mask or rename a column
You can use the tools available in the Fields tab of the Layer properties, in QGIS:
to avoid displaying a column in the popup, uncheck the relative WMS checkbox. The WMS column is on the right
to change the name displayed for that column, type a different name in the Alias column
Usage of media: images, documents, etc.
If you use paths to documents of the media directory, you can:
display the image found at that link
display the content (text or HTML) of the file
display a link to a document
Vedi anche
Chapter Media in Lizmap for more details on the usage of documents of the directory media in the popups.
Usage of external links
You can also use, in a field, full web links to a specific page or image:
the image referred to will be displayed, instead of the links
the web link will be displayed and clickable
Popup Lizmap
Introduzione
If the simple table display does not suit your needs, you can write a popup template. To do so, you should know well the HTML format. See e.g.: http://html.net/tutorials/html/
Avvertimento
When you use the lizmap mode, the previous configuration to rename a field does not work anymore: you have to configure what is displayed and how through the template. Managing media is also possible, but you have to configure it as well.
Deploying
You can edit the popup template with the button Configure in the Lizmap plugin. Clicking on it you’ll get a window with two text areas:
un” area dove puoi digitare un testo
a read-only area, showing a preview of your template
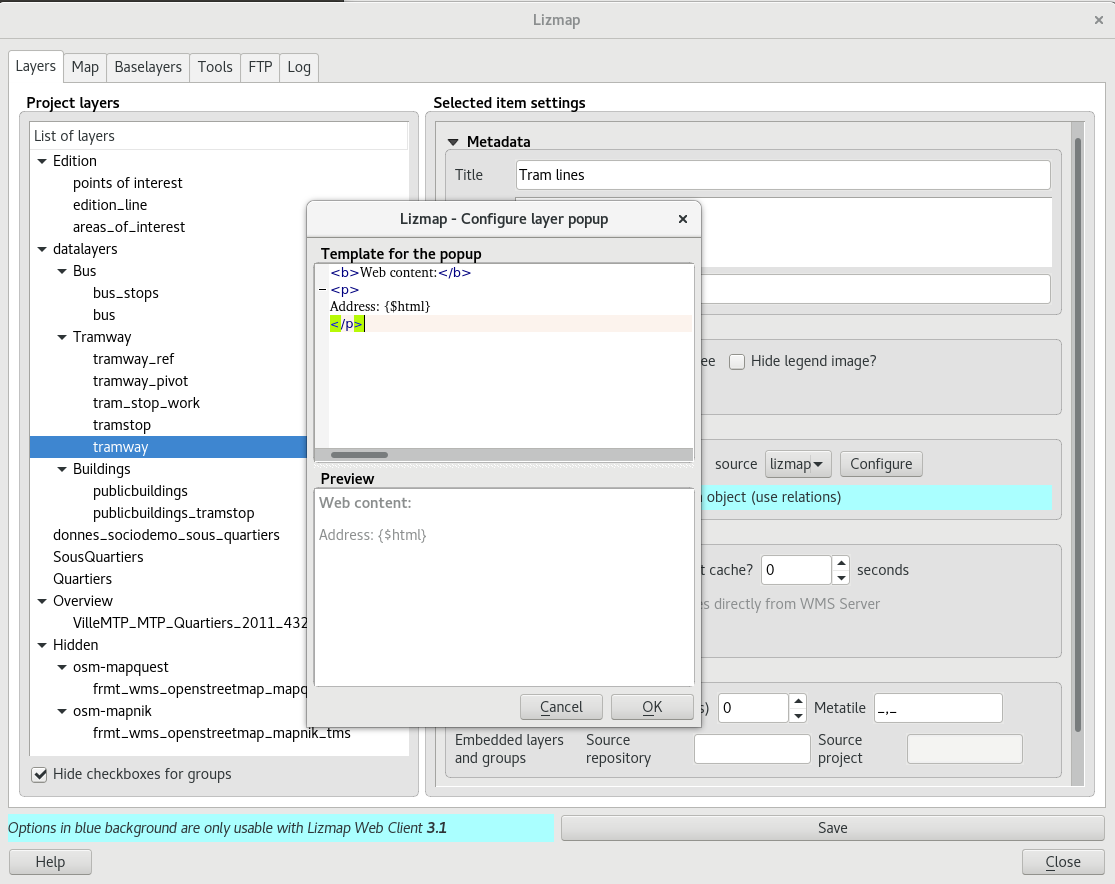
You can type simple text, but we suggest to write in HTML format to give proper formatting. For instance, you can add paragraphs, headings, etc.:
<h3>A Title</h3>
<p>An example of paragraph</p>
The behaviour is as follows:
if the content of the two areas is empty, a simple table will be shown in the popup (default template)
if the content is not empty, its content will be used as a template for the popup
Lizmap Web Client will replace automatically a variable, identified by the name of a field, with its content. To add the content of a column to a popup, you should use the name of the column precede by a dollar sign ($), all surrounded by curly brackets ({}). For instance:
<h3>A Title</h3>
<p>An example of paragraph</p>
<p>A name: <b>{$name}</b></p>
<p>Description: {$description}</p>
Nota
If you have configured an alias for a field, you have to use the alias instead of the name, between the brackets.
You can also use the values of the columns as parameters to give styling to the text. An example here, to use the colour of a bus line as a background colour:
<p style="background-color:{$color}">
<b>LINE</b> : {$ref} - {$name}
<p/>
Uso di media e link esterni
You can use the media referred to in the table content, even if you use a template model. To do this, you should use the media column, taking into account the fact that Lizmap Web Client automatically replaces the relative path of the type /media/myfile.jpg with the full URL to the file, accessible through the web interface.
You can also use full URLs pointing to the pages or images on another server.
Here an example of a template handling media and an external link:
 <p style="font-size:0.8em;">A Title</p>
 <p>The name is {$name}</p>
<p>
   A sample image<br/>
   <img src="{$image_column}" style="">
 </p>

 <p><a href="{$website}" target="_blank">Web link</a></p>

 <p><img src="http://www.3liz.com/assets/img/logo.png"/></p>
Vedi anche
Chapter Media in Lizmap for more details on the use of documents in the directory media.
Popup QGIS
QGIS popups can be configured via QGIS –> Layer properties –> Tooltips –> HTML, using the same syntax as for the lizmap popups. The main advantages of this approach are:
you can use QGIS variables and expressions, thus adding information created dynamically
the popup can be previewed in QGIS, using tooltips
the popup configurations are stored in QGIS project and layer style, so they can be reused in other Lizmap projects without replicating the configuration.
Relazioni uno a molti
It is possible to display multiple objects (photos, documents) for each geographical feaature. To do so, you have to configure both the QGIS project and the Lizmap config.
Nel progetto QGIS:
Use 2 separate layers to store the main features and the pictures. For example «trees» and «tree_pictures». The child layer must contain a field referencing the parent layer id
Configure aliases and field types in tab Fields of the layers properties dialog. Use «Photo» for the field which will contains the relative path to pictures
Add a relation in QGIS project properties between the main layer «trees» and the child layer «tree_pictures»
Add data to the layers. You should use relative path to store the pictures path. Theses paths must refer to a project media subdirectory, for example: media/photos/feature_1_a.jpg
Nel plugin Lizmap:
In the Layers tab, activate popup for both layers. You can configure popup if you need specific layouts ( See documentation on popups )
For the parent layer, activate the option «Display relative children under each object (use relations)»
Add the two layers in the Attribute table tab
You can optionally activate editing for the two layers, to allow the web users to create new features and upload pictures
Salva e pubblica il progetto e la configurazione Lizmap
Link of an element for layers with an atlas
Every element of a layer with an atlas configured will have a link at the end of his popup which open a pdf of the atlas for this particular element. To make it work you will need to download the «atlas_print» plugin, for that you have to get it from his Github at : https://github.com/3liz/qgis-atlasprint
Display children in a compact way
You can change the way children are displayed and make them look like a table. For that, you will need to adapt the HTML of your children layer and use a few classes to manipulate it.
«lizmap_merged» : You need to attribute this class to your table
lizmapPopupHeader : If you want to have a better display of your headers, you will need to put this class in the “<tr>” who contains them
lizmapPopupHidden : This class permit you to hide some elements of your children that you want to hide when there are used as a child but you still want to see them if you display their popup as a main Popup
Here an example:
<table class="lizmap_merged">
 <tr class="lizmapPopupHeader">
     <th class="lizmapPopupHidden"><center> Idu </center></th>
     <th> <center> Type </center> </th>
     <th> <center> Surface</center> </th>
  </tr>
  <tr>
     <td class="lizmapPopupHidden"><center>[% "idu" %]</center></td>
     <td><center>[% "typezone" %]</center></td>
     <td><center>[% "surface" %]</center></td>
  </tr>
</table>
Creare temi semplici
Starting from Lizmap Web Client version 2.10, it is possible to create themes for all maps of a repository or for a single map. This function needs to be activated by the administrator and uses the directory media Media in Lizmap.
La regola è:
the directory
mediacontains a directory namedthemesthe directory
themescontains a default directory for the theme of all the maps of the repositorythe directory
themesmay contain a directory per project, for the themes specific for each project
-- media
  |-- themes
    |-- default
    |-- map_project_file_name1
    |-- map_project_file_name2
    |-- etc
In order to simplify the creation of a theme for a repository or a map, Lizmap allows you to obtain the default theme fro the application, through the request: index.php/view/media/getDefaultTheme.
The request returns a zipfile containing the default theme, with the following structure:
-- lizmapWebClient_default_theme.zip
  |-- default
    |-- css
      |-- main.css
      |-- map.css
      |-- media.css
      |-- img
        |-- loading.gif
        |-- etc
      |-- images
        |-- sprite_20.png
        |-- etc
Una volta scaricato il file zip, è possibile:
sostituisci le immagini
modifica il file CSS
Avvertimento
The files and directories must be readable (755:644)
To preview your results just add &theme=yourtheme at the end of your URL (e.g. https://demo.lizmap.3liz.com/index.php/view/map/?repository=montpellier&project=montpellier&theme=yourtheme).
Once your theme is ready, you can just publish it copying it in the directory media.
Adding your own JavaScript
Purpose
This is useful for a variety of advanced usage. For instance, you can avoid people being able to download elements of the page by right clicking on them, and of course much more.
Nota
This is available starting with Lizmap 2.11. For earlier versions, you must add your code directly to file lizmap/www/js/map.js.
In your repository (e.g.
/home/data/repo1/myproject.qgsyou should have these directories:media |-- js |-- myproject
All the Javascript code you copy in the
/home/data/rep1/media/js/myproject/directory will be executed by Lizmap, provided that:you allow it, through the Lizmap admin interface, adding the privilege «Allow themes for this repository» in the form for the modification of the repository
Available Javascript events
The Javascript code can use many events fired by Lizmap Web Client. Here is a list of all the events available, with the returned properties.
Event name |
Descrizione |
Proprietà restituite |
|---|---|---|
treecreated |
Fired when layer tree has been created in legend panel |
|
mapcreated |
Fired when OpenLayers map has been created |
|
layersadded |
Fired when Openlayers layers have been added |
|
uicreated |
Fired when interface has been created |
|
dockopened |
Fired when a dock is opened (left panel) |
id |
dockclosed |
Fired when a dock is closed (left panel) |
id |
minidockopened |
Fired when a mini-dock ( right container for tools) is opened |
id |
minidockclosed |
Fired when a mini-dock is closed |
id |
bottomdockopened |
Fired when the bottom dock is opened |
id |
bottomdockclosed |
Fired when the bottom dock is closed |
id |
lizmapbaselayerchanged |
Fired when the baselayer has been changed |
layer |
lizmapswitcheritemselected |
Fired when a layer has been highlighted in the layer legend panel |
name | type | selected |
layerstylechanged |
Fired when a layer style has been changed |
featureType |
lizmaplocatefeaturecanceled |
Fired when the user has canceled the locate by layer tool |
featureType |
lizmaplocatefeaturechanged |
Fired when the user has selected an item in the locate by layer tool |
featureType | featureId |
lizmappopupdisplayed |
Fired when the popup content is displayed |
|
lizmappopupdisplayed_inattributetable |
Fired when the popup content is displayed in attribute table (right sub-panel) |
|
lizmapeditionformdisplayed |
Fired when a edition form is displayed |
layerId | featureId | editionConfig |
lizmapeditionfeaturecreated |
Fired when a layer feature has been created with the edition tool |
layerId |
lizmapeditionfeaturemodified |
Fired when a layer feature has been modified with the edition tool |
layerId |
lizmapeditionfeaturedeleted |
Fired when a layer feature has been deleted with the edition tool |
layerId | featureId |
attributeLayersReady |
Fired when all layers to be displayed in the attribute layers tool have been set |
layers |
attributeLayerContentReady |
Fired when a table for a layer has been displayed in the bottom dock |
featureType |
layerfeaturehighlighted |
Fired when a feature has been highlighted in the attribute table ( grey rectangle ). Firing this event manually forces a refresh of child tables if any exist for the layer |
sourceTable | featureType | fid |
layerfeatureselected |
Fire this event to trigger the selection of a feature for a layer, by passing feature id. Once the selection is done, the event layerSelectionChanged is fired in return. |
featureType | fid | updateDrawing |
layerfeaturefilterselected |
Fire this event to trigger the filtering of a layer for the selected features. You must select some features before firing this event. Once the filter is applied, Lizmap fires the event layerFilteredFeaturesChanged in return. |
featureType |
layerFilteredFeaturesChanged |
Fired when a filter has been applied to the map for a layer. This event also trigger the redrawing of the map and the attribute tables content. |
featureType | featureIds | updateDrawing |
layerFilterParamChanged |
Fired when the WMS requests parameters have changed for a layer. For example when a STYLE or a FILTER has been modified for the layer. |
featureType | filter | updateDrawing |
layerfeatureremovefilter |
Fire this event to remove any filter applied to the map. Once done, the event layerFilteredFeaturesChanged is fired back, and the map content and attribute tables content are refreshed. |
featureType |
layerSelectionChanged |
Fired when the selection have been changed for a layer. This also trigger the redrawing of attribute table content and map content |
featureType | featureIds | updateDrawing |
layerfeatureselectsearched |
Fire this event to select all the features corresponding to the displayed lines of the attribute table, which can be visually filterd by the user by entering some characters in the search text input. |
featureType | updateDrawing |
layerfeatureunselectall |
Fire this event to remove all features from selection for a layer. Once done, Lizmap responds with the event layerSelectionChanged |
featureType | updateDrawing |
lizmapexternalsearchitemselected |
Fired when the user has selected an item listed in the results of the header search input |
feature |
There are also some variables which are available.
Variable name |
Descrizione |
|---|---|
lizUrls.media |
URL to get a media |
lizUrls.params.repository |
Name of the current repository |
lizUrls.params.project |
Name of the current project |
Examples
Here is a very small example allowing you to disable right clic in Lizmap. Just add a file named e.g. disableRightClick.js with the following code:
lizMap.events.on({
   uicreated: function(e) {
      $('body').attr('oncontextmenu', 'return false;');
   }
});
If you want this code to be executed for all projects of your repository, you have to copy the file in the directory
/home/data/rep1/media/js/default/rather than in/home/data/rep1/media/js/myproject/.
Here is a very useful example allowing you to send current login User-ID (and/or other user data) to PostgreSQL table column, using edition tool.
var formPrefix = 'jforms_view_edition';

// Name of the QGIS vector layer fields which must contain the user info
var userFields = {
   login: 'lizmap_user_login',
   firstname: 'lizmap_user_firstname',
   lastname: 'lizmap_user_lastname',
   organization: 'lizmap_user_organization'
};


lizMap.events.on({

   'lizmapeditionformdisplayed': function(e){

      // If user is logged in
      if( $('#info-user-login').length ){
            // Loop through the needed fields
            for( var f in userFields ){
               // If the user has some data for this property
               if( $('#info-user-' + f).text() ){
                  // If the field exists in the form
                  var fi = $('#' + formPrefix + '_' + userFields[f]);
                  if( fi.length ){
                        // Set val from lizmap user data
                        fi.val( $('#info-user-' + f).text() )
                        // Set disabled
                        fi.hide();
                  }
               }
            }
      }

   }

});
In the directory lizmap-web-client/lizmap/install/qgis/media/js/ you can find examples of suitable JavaScript code; just remove the extension .example and copy them to your media/js/default/ folder to activate them. You can also find some examples in the repository https://github.com/3liz/lizmap-javascript-scripts
If you want to get the URL of a static file.
var mediaUrl = OpenLayers.Util.urlAppend(
     lizUrls.media,
     OpenLayers.Util.getParameterString({
         "repository": lizUrls.params.repository,
         "project": lizUrls.params.project,
         "path": "picture.png"
     })
);
Printing configuration
To add print capabilities in the online map, you have to enbale the printing tool in the plugin Map tab (Configure the map) and the QGIS project has at least one print composition.
The print composition must contain at least one map.
you can add :
an image to North arrow
an image for the logo of your organization
a legend that will be fixed for all printing (before version 2.6)
a scale, preferably digital for display
a location map, a map for which you have enabled and configured the function of Overview
labels
You can allow the user to modify the contents of certain labels (title, description, comment, etc). To do this you need to add a identifier to your label in the composer. Lizmap will automatically ask you in the webbrowser to fill each fields. If your label is pre-populated in QGIS, the field will be pre-populated too in the webbrowser. If you check “Render as HTML” for your label in QGIS, you will have a multiline label in Lizmap.
Finally the print function will be based on the map scales that you set in the plugin Map (Configure the map).
Nota
It is possible to exclude printing compositions for the web. For example, if the QGIS project contains 4 compositions, the project administrator can exclude 2 compositions in the QGIS project properties, OWS server tab. So only the published compositions will be presented in Lizmap.
Allow printing of external baselayers
The Lizmap plugin Baselayers tab allows you to select and add external baselayers (Configure the base layers). These external baselayers are not part of the QGIS project, default print function does not integrate them.
To overcome this lack Lizmap offers an easy way to print a group or layer instead of the external baselayer.
To add to printing a layer that replaces an external baselayer, simply add to the QGIS project a group or layer whose name is part of the following list:
osm-mapnik for OpenStreetMap
osm-mapquest for MapQuest OSM
osm-cyclemap for OSM CycleMap
google-satellite for Google Satellite
google-hybrid for Google Hybrid
google-terrain for Google Terrain
google-street for Google Streets
bing-road for Bing Road
bing-aerial for Bing Aerial
bing-hybrid for Bing Hybrid
ign-scan for IGN Scan
ign-plan for IGN Plan
ign-photo for IGN Photos
and then add your layer(s) you want to print as base.
Nota
The use of this method must be in compliance with the licensing of external baselayers used (Configure the base layers).
For OpenStreetMap baselayers, it is possible to use an XML file for GDAL to exploit the OpenStreetMap tile services. Its use is described in the GDAL documentation http://www.gdal.org/frmt_wms.html or in this blog post http://www.3liz.com/blog/rldhont/index.php?post/2012/07/17/OpenStreetMap-Tiles-in-QGIS (beware, EPSG code should be 3857).
By cons, if this layer has to replace an external baselayer, it must be accessible to QGIS-Server but should not be accessible to the user in Lizmap Web Client. So it must be hidden. See chapter Masking individual layers.
Optimizing Lizmap
General concepts
Rendering speed is crucial for a webGIS, much more so than for a desktop application:
web users expect to have everything available almost immediately
each user can sends requests to the same application; if you have tens or hundreds of users, you can easy understand that optimising your web application is an important task.
You have to think to a web publication for many users rather than the display of a map to a single user.
By default, for each QGIS layer you add to your Lizmap project, you can choose from the Lizmap plugin whether to toggle the layer visibility on (checkbox Toggled?) at the startup of the application. You have to be careful not to abuse this feature, because if the project contains e.g. 30 layers, Lizmap at startup will send a request to QGIS server for each of them. If the checkbox Single Tile? is ticked, this will request 30 images of the size of your browser window. If not, Lizmap, through OpenLayers, will request 30 series of tiles (about 250 by 250 pixel). Each tile is an image, and is created as a function of the total window size and zooming level. Therefore, subsequent users will zoom in the same area, the tiles already generated will be reused. The tiles can be cached with two non exclusive systems:
server side, on the machine where QGIS server and Lizmap are installed. If the tile has been requested and generated earlier, and not expired, Lizmap will reuse it and send it to the client, avoiding a new request to QGIS server
client side: the tiles will be saved in the browser cache, and reused until they expire. This avoid both the request to QGIS server and the internet traffic.
The server cache has to be generated. In Lizmap <3, the only way of creating the tiles is to zoom and pan the whole map, and wait until all the tiles have been displayed. This is obviously impractical for projects covering a large area, with many zoom levels. in Lizmap >=3 we have developed a command line tool to generate all the tiles, or a selection of them.
To optimize the performance, is therefore important to understand how Lizmap uses the tiles to be displayed.
Let’s say you have a screen of 1280 by 768 pixels. If you have all your layers tiled, Lizmap has therefore to show about 5 by 3= 15 tiles (256 by 256 pixel each) per layer, and more for a larger screen, now common. If surrounding tiles are only partially shown, the total number will be even greater. An average of 20 tiles per layer is a reasonable estimate. With 30 layers, as in our example, this will mean a total of about 20 by 30= 600 tiles (therefore, 600 requests to Lizmap server) per user, at each startup of Lizmap and for every zoom & pan. If you have 10 concurrent users, this gets quite heavy for the server, if the cache has not been generated previously, and QGIS server has therefore to create them. The time required for each tile will depend heavily on the performance of the server and the complexity of the project.
The size of each tile will depend on:
the type of data (single raster or vector, or combination of several layers)
the image format chosen (PNG, JPEG)
A typical tile could be around 30 Kb. In our example, the client will therefore download about 20 by 30= 600 Kb per layer, which, for 30 layers, will give a grand total of about 18 Mb, which is heavy both for the server (lots of connection bandwidth consumed) and for the users (long delay, even with a reasonably fast connection).
These calculations show clearly that to achieve good performances in webmapping you have to make choices, and simplify as much as possible.
If one looks, for instance, at the approach taken by Google Maps or similar services, it is quite obvious that, besides having powerful servers, they have simplified as much as possible: only one tile series as a base layer, and very few additional layers (and not all at the same time). Even if you cannot create such a simple map, it’s important nonetheless knowing which layers should absolutely be shown at the first display of the map, and which compromises are acceptable for your users.
If your project has 50 layers to be switched on and off, the vast majority of your users will never select most of them. Of course, there are real use cases where individual layers must be displayed selectively, and it is therefore not possible to group them to reduce the number of layers displayed.
To optimize your application as much as possible, we suggest you to:
Create separate QGIS projects, and therefore different Lizmap maps, for different aims, thus grouping data in logical themes. For instance, a map about urban development with maybe 10 layers and one about environment, with about 5 layers, are usually more readable, and much faster, than a single overcomplex project with all the data. Adding a small image for each project will help users to select the relevant project at first sight. You can also share some of the layers among different projects, through the embedding mechanism in QGIS.
Use the option Maps only in the administrator web interface. This option allows the user to switch automatically from one map to another, through the button Home, maintaining as much as possible the localization and the zooming level. In this case, the Lizmap welcome page with the list of projects and their thumbnails is not displayed, and the user is directed automatically to one of the projects, at the administrator choice.
Do not show all the layers at startup (deactivate the checkbox Toggled? as described above). Only very important layers should be visible by default, and users should activate only the layer they need. This allow a sensible reduction in the number of requests, and of the total network traffic.
Create groups of layers, and use the option Group as layer? in Lizmap plugin. Generally a series of layers of the same general theme can be displayed as a whole, with an appropriate choice of styles. In this case, Lizmap will only show one checkbox for the whole group, and more importantly it will request only one series of tiles for the whole group, thus reducing the number of tiles and server requests, and the total volume of data to be downloaded. The legend of the group will be displayed.
Use the option Single Tile? for some layers. In this case, Lizmap will request only one image per layer, of about the size of the screen, instead of a series of tiles. This will therefore greatly reduce the number of requests to the server. For instance, in our example above, without the optimizations described, if all the layers are displayed, every user will request 30 images (one per layer) for every zoom or pan, instead of 480. The total size of data to be downloaded is however similar. On the other hand, different users will be very unlikely to request exactly the same image, therefore using a cache is pointless in this case, and is avoided by Lizmap (the two options are mutually exclusive). The optimal choice (single tile vs. tiled) is different for different layers. For instance, a complex base layer, created by combining 15 individual layers, will be best used as a group (Group as layer?), tiled and cached. A simple linear layer, like a series of bus lines, can be displayed as a single tile.
Use the option Hide checkboxes for groups: this avoids the users to click on a group with e.g. 20 layers without really needing it, thus firing a big series of requests to the server. In any case, avoiding groups of more than 5-10 layers is usually good practice.
Optimize the data and the QGIS project. As mentioned above, publishing a map over the internet will change your point of view: as said, you have to remember that many users can hit the server in parallel, so avoiding to overload it is crucial to:
create a spatial index for all your vector layers
pyramidize all your raster layers (except the very small ones)
only display data at appropriate scale: for instance, displaying a detailed building layer at 1:500,000 is meaningless, as the image is almost unreadable, and puts a lot of stress on the server
use simplified version of a layer to display it at different scales. You can then group the original layer (to be displayed e.g. around 1:1,000) with the simplified versions (to be displayed e.g. around 1:10,000, 1:50,000, etc.), and Goup as a layer to let the user see this as a single layer, using the most appropriate data at each scale
be careful about On The Fly (OTF) reprojection. If, for instance, you display data in Lambert 93 (EPSG:2154) on a base map from OpenStreetmap or Google (in Pseudo Mercator, EPSG:3857), QGIS Server needs to reproject rasters and vectors before generating the map. This may have an impact in rendering times for large and complex layers. In France, you can avoid reprojection by using the base map from IGN Géoportail directly in EPSG:2154
be aware of the fact that certain rendering options (e.g. labels, expressions, etc.) can be very demanding from the server
if you use PostGIS, optimize it: always add spatial indexes, indexes for filtered fields, for foreign keys, appropriate parameters for the configuration of PostgreSQL, possibly a connection through Unix socket instead of TCP/IP (you can do this through the use of services), etc.
use an appropriate image format. For the base layers, where you do not need transparency JPEG is usually the best option: the tiles will be smaller, and faster to download. For other layers, try smaller depth PNGs (16bit or 8bit): for some symbolizations, the visual result may be the same, and the tiles smaller. Have a check to see if the image quality is acceptable in your case
Upgrade your server. This is always an option, but is often useless if you did not optimize your project as described above. In any case, a low end server (e.g. 2 Gb RAM, 2 cores at 2.2 GHz) is unsuitable. A fast quad-core with 8 Gb RAM is a reasonable minimum. Avoid installing QGIS server and Lizmap on Windows, it’s more complex and slower.
Nota
In Lizmap 3 you’ll find several improvements that will help optimizing your installation:: * a tool for the preparation of the server cache, through the use of a WMTS protocol. In addition, this will allow to use the cached layers as WMTS layers in QGIS desktop * avoiding the automatic download of the legends at startup, and at every zoom level; this will be done exclusively on demand, if the legend is displayed, thus saving one request per layer for each zoom * code optimization.
In detail: how to activate the caches
The Lizmap plugin Layers tab allows you to enable for each layer or group as a layer the cache for generated images. This feature is not compatible with the option not tiled image.
Activating the cache server side
Lizmap Web Client can dynamically create a cache tiles on the server. This cache is the storage of the images already generated by QGIS-Server on the server. The Lizmap Web Client application automatically generates the cache as the tiles are requested. Enable caching can greatly lighten the load on the server, since we do not want more QGIS-Server tiles that have already been made.
To activate it you must:
check the box Server cache?
specify the expiration time of the cache server in seconds: Expiration (seconds)
The Metatile option allows you to specify image size in addition for generating a tile. The principle of Metatile is to request the server for a bigger image than hoped, to cut it to the size of the request and return it to the Web client. This method avoids truncated labels at the edges and discontinuities between tiles, but is more resource intensive. The default value is 5,5, an image whose width and height are equal to 5 times the width and height request. This option is useless for rasters.
Activating the cache client side
The Browser client cache option allows you to specify an expiration time for the tiles in the Web browser (Mozilla Firefox, Chrome, Internet Explorer, Opera, etc.) cache in seconds. When browsing the Lizmap map with the browser, it stores displayed tiles in its cache. Enable client cache can greatly optimize Lizmap because the browser does not re-request the server for tiles already in cache that are not expired. Values 0,0 and 1,1 are equivalent, and do not activate the option.
We suggest to set to the maximum value (1 month equals to 24 x 3600 x 30 = 2,592,000 seconds), except of course for layers whose data changes often.
Nota
The cache must be activated only once mastered rendering, when you want to move the project into production.
The 2 cache modes, Server and Client, are completely independent of one another. But of course, it is interesting to use the two together to optimize the application and free server resources.
Centralizing the cache with the integration of groups and layers from a master project
In QGIS, it is possible to integrate in a project, groups or layers from another project (which will be called «parent»). This technique is interesting because it allows you to set the properties of the layers once in a project and use them in several other, for example for baselayers (In the «son» projects that integrate these layers, it is not possible to change the properties).
Lizmap uses this feature to centralize the tiles cache. For all son projects using integrated layers of the parent project, Lizmap requests QGIS-Server tiles from the parent project, not form son projects. The cache will be centralized at the parent project, and all son projects that use layers benefit shared cache.
To use this feature, you must:
publish the parent QGIS project with Lizmap
you must choose the right announced extent in the OWS Server tab from project properties, because this extent will be reused identically in son projects.
you must configure the cache for the layers to integrate. Also, note the options chosen here (image format, metatile, expiration) for use as such in the son projects.
It is possible to hide the project from the main page of Lizmap with the check box Hide the project Web Client Lizmap in the plugin “Map” tab.
open the son project, and integrate layers or groups in this project, for example orthophoto. Then you must:
verify that the announced extent in the QGIS project properties / OWS Server is exactely the same as the parent project.
you must configure the cache for the integrated layer with exactly the same options as those selected from the parent project: image size, expiration, metatile.
you must set the Lizmap id of the Source repository of the parent project (The one configured in the Lizmap Web Client administration interface).
the code of the «Source project» (the name of the parent QGIS project without the .qgs extension) is automatically entered for layers and integrated groups.
Publish the son project to the Lizmap Web Client as usual.
Masking individual layers
You can exclude layers of your publication with the OWS Server tab of the QGIS project properties. In this case the layers will not be available in Lizmap. With this method, you cannot use a layer in the locate by layer function and not display in the map.
To overcome this lack Lizmap offers a simple way to not display some layers.
Not to display one or more layers of QGIS project in the legend of the Web map, just put these layers in a group called «hidden». All the layers in this group will not be visible in the Web application.
This feature can be used for:
hide a layer used in the locate by layer (Add the localization function)
hide a simple layer for adding data rendered with a view
hide a layer for printing (Allow printing of external baselayers)
Show attribute table for Lizmap layers
Regola
Lizmap is designed to show spatial data in the main map, and you can propose users to see an object data through the «popup» feature (a small popup containing the objects data is shown whenever the user clicks on the map ). See How to configure popups
Sometimes this is not enough, and as a map editor, you would like the user to see all the data of a specific layer, as you can do in QGIS by opening the attribute table. Since Lizmap 2.11, you can propose such a feature for any vector layer published in you map. (This feature has been heavily enhanced since Lizmap 3.0. Many features described underneath are only available for Lizmap 3.0 )
Activate the attribute table tool for a vector layer
In the Tools tab of Lizmap plugin dialog, there is a group called «Attribute layers» which shows a table and some form fields dedicated to add or remove vector layers.
Lizmap Web Client uses the Web Feature Service (WFS) to get data from a QGIS vector layer and display it in the web interface. This is why the first thing to do whenever you want to show a layer data in the web client is to publish the vector layer through the WFS. To do so, open the Project properties dialog, got the the OWS Server tab, and add the layer as «published» by checking the corresponding checkbox in the Web Feature Service table, and save the project. You can also tune the number of decimals to decrease the size of data to be fetched from WFS ( keep 8 only for a map published in degrees, and keep 1 for map projections in meters )
Once the layer is published through WFS, you can add it in the attribute layers table. Some options are available to finely tune the features provided to the user:
Layer: Choose one of the vector layers (spatial or not). This can be any vector layer format : GeoJSON, Shapefile, PostGIS, CSV, etc.
Unique ID: The attribute table tool needs to be able to defined each feature as unique. We strongly advise you to add such a field if your layer has not one yet. Usually the unique ID field contains integers. If the layer do not have this kind of field, you can easily create it with the Field calculator. Choose the correct field with the combo box.
Fields to hide: You have 2 ways of hiding fields in the published attribute table.
In the vector layer properties dialog of the QGIS vector layer, in the Fields tab, you can uncheck the checkbox of the column WFS for the fields to unpublish. This means this fields will not be published via the WFS protocol. This is the simplest and safiest way to restrict the publication to some fields (for example to get rid of sensitive fields)
You can use this Fields to hide option to hide the given fields in the attribute table display. The hidden fields won’t be visible for the end user, but will still be available for Lizmap Web Client. You must use this option to hide the Unique ID field. If you use the first way (uncheck WFS column), the unique ID won’t be usable by Lizmap, and some of the attribute table features will not work properly.
Using relations with the attribute layers tool
In QGIS, you can configure relations between layers, in the project properties dialog. If you publish in Lizmap more than one layers in the attribute layers tool, and if some layers are part of a relation, the end user will be able to see child tables under the parent layer table, and a click on one line in the parent table will trigger the filter of the child tables content.
For example, you could have a layer of cities, and a child layer of public building. Clicking on one city in the attribute table will make the public building child table refresh its content with only the public buildings of the clicked city.
You can use «many-to-many» (N:M) relations in QGIS since version 2.14 but Lizmap doesn’t use it automatically yet. You have to define the relations in the Lizmap plugin too. In many cases, N:M relations are very handy. For example, you can have the three following vector layers in your project:
Tramway lines: this layers name «Lines» contains one feature per tram line, and has a unique ID field tram_id
Tramway stops: this layer named «Stops» contains one feature per tram stop, with a unique ID field called stop_id
Correspondance table between lines and stops: this layer named «Pivot» is a pivot table between tram lines and stops, since a stop can be used for more than one line, and a line serves many stops. It has the following fields: tram_id, stop_id and order which defines the order of the stop in the line.
You can add 2 relations in QGIS project properties : one between Lines and Pivot using the tram_id field, and one between Stops and Pivot using the stop_id field.
In Lizmap, we added a simple way to configure the N:M relation. You can simply
Create the two relations described above in QGIS project properties dialog, tab Relations
Add the Lines and Stops layers in the attribute layers tool
Add the Pivot layer in the attribute layers tool with the option Pivot table checked
Lizmap Web Client will then handle the relation as a N:M relation:
The pivot table will be displayed under each parent attribute table and show only the corresponding children.
The filter feature based on the attribute layers will trigger the cascading filter of the pivot and the other parent. For example, if the user uses the filter to show only one tramway line, Lizmap will also only show the corresponding stops in the map and in the Stops attribute tables
Attribute table and edition
todo
Editing data in Lizmap
Regola
Since version 2.8, it is possible to allow users to edit spatial and attribute data from the Lizmap Web Client interface for PostgreSQL or Spatialite layers of the QGIS project. The Lizmap plugin allows you to add one or more layers and choose what actions for each will be possible in the web interface:
creating elements
modifying attributes
modifying the geometry
deleting elements
The Web form presented to the user to populate the attribute table supports editing tools available in the fields tab of the QGIS Vector layer properties. You can configure a dropdown, hide a column, make it non-editable, use a check box, a text area, etc. All configuration is done with the mouse, in QGIS and the Lizmap plugin.
In addition, Lizmap Web Client automatically detects the column type (integer, real, string, etc.) and adds the necessary checks and controls on the fields.
Usage examples
A town wish that citizens identify visible problems on the road: uncollected trash, broken street lights, wrecks to remove. The QGIS project administrator creates a layer dedicated to collect data and displays them to all.
An engineering office wants to allow project partners to trace remarks on the project areas. It allows the addition of polygons in a dedicated layer.
Configuring the edition tool
To allow data editing in Lizmap Web Client, you must:
At least one vector layer with PostGIS or Spatialite type in the QGIS project.
Configure editing tools for this layer in the fields tab of the layer properties. This is not required but recommended to control the data entered by users.
Add the layer in the tool with the plugin
Here are the detailed steps:
If necessary, create a layer in your database with the desired geometry type (point, line, polygon, etc.)
think about adding a primary key: this is essential!
the primary key column must be of type auto-increment. For example serial to PostgreSQL.
think about adding a spatial index: this is important for performance
create as many fields as you need for attributes: if possible, use simple field names!
Please refer to the QGIS documentation to see how to create a spatial layer in a PostGIS or Spatialite database: http://docs.qgis.org/html/en/docs/user_manual/index.html
Set the editing tools for your layer fields
Open the layer properties by double-clicking on the layer name in the legend.
Go to Fields tab.
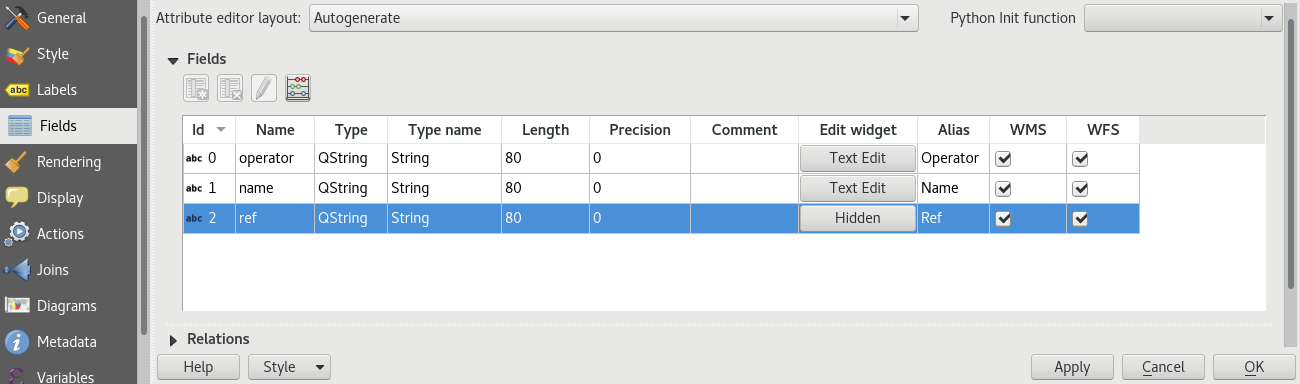
Select the Editing tool in the Edit widget column for each field of the layer:
To hide a field, choose Hidden. The user will not see the field in the form. There will be no content inserting. Use it for the primary key.
To add a read-only field, unchecked Editable checkbox.
Special case of the option Value Relation. You can use this option for a Lizmap map. For users to have access to information of the outer layer that contains the data, you must enable the publication of the layer as a WFS layer in the OWS Server tab of the QGIS project properties.
etc.
QGIS 2 evolutions:
To hide columns in the Lizmap popup, you must now uncheck the box in the WMS for each field to hide (this column is just after Alias)
Lizmap Web Client does not know the «QT Designer UI file» for form generation. Therefore only use the Autogenerate mode or Drag and drop mode for editing layers.
Nota
All the editing tools are not yet managed by Lizmap Web Client. Only the following tools are supported: Text edit, Classification, Range, Value Map, Hidden, Check Box, Date/Time, Value Relation, Relation Reference. If the tool is not supported, the web form displays a text input field.
Nota
To make the field compulsory you have to define it as NOT NULL in the properties of the table, at the database level.
Nota
Be careful if your layer contains some Z or M values, unfortunately Lizmap will set them to «0» which is the default value when saving to the database.
Add the layer in the table «Layer Editing» located in the plugin Lizmap «Tools» tab:
Select the layer in the drop-down list
Check the actions you want to activate from:
Create
Modify attributes
Modify geometry
Delete
Add the layer in the list with the «Add layer» button.

Reusing data of edition layers
The layers that you have selected for the editing tool are «layers like the others», which means:
QGIS styles and labels are applied to these layers. You can create styles and labels that depend on a value of a layer column.
If you want to propose the editing tool, but does not allow users to view data from the online layer (and therefore the additions of other users): you can simply hide edition layers by putting them in a hidden directory. See Masking individual layers
The layers are printable if they are not masked.
The data are stored in a layer of the project. The administrator can retrieve this data and use them thereafter.
Nota
PostGIS or Spatialite? To centralize things, we recommend using a PostGIS database to store data. For Spatialite layers, be careful not to overwrite the Spatialite file stored in the Lizmap directory on the server with the one you have locally: remember always to make a backup of the server file before a new sync your local directory.
Nota
Using the cache: whether to use the server or client cache for editing layers, do so by knowingly: the data will not be visible to users until the cache has not expired. We suggest not to enable the cache for editing layers.
Nota
Lizmap 3 only
Adding files and images for features
Use the media/upload folder relative to the project
With Lizmap 3, it is now possible to upload your files, including images, for each feature, during online editing; to achieve this, you need to:
Configure edition for the layer, with one or more fields with the edit type «Photo» or «File». For example, let say the field name is «photo»
Create a folder at the root of the QGIS project file : media/ and a subfolder media/upload (obviously you need to do that locally in your computer and server side ).
Give webserver user (usually www-data) write permission on the upload folder, so that it can create files and folders in media/upload:
chmod 775 -R media/upload && chown :www-data -R media/upload
Check you
php.inito see if the variablespost_max_sizeandupload_max_filesizeare correctly set (by default, php only allows uploading files up to 2 Mbyte)
Lizmap will then create folders to store the data, depending on the layer name, field name, etc. For example, a file would be stored in the folder media/upload/PROJECT_NAME/LAYER_NAME/FIELD_NAME/FILE_NAME.EXT and an image in media/upload/environment/observations/species_picture/my_picture.png.
Obviously you will be able to display this image (or any other file) in the popup, as it will be stored in the media folder. See Uso nel pop-up
Use a specific destination folder
Since Lizmap 3.2, you can override the default destination folder media/upload/PROJECT_NAME/LAYER_NAME/FIELD_NAME/FILE_NAME.EXT by manually setting the path where to store the media, relatively to the project. To do so, you must use the External resource field edit widget, and configure it with:
a Default path written relative to the project. For example
../media/images/if you want to store this field files in a folder media situated alongside the project folder. You can also choose set a path inside the project media folder. For examplemedia/my_target_folder/.chek the Relative path checkbox, with the default Relative to project path option
if the field should store a image, you should also check the Integrated document viewer checkbox, with the type Image
This allow to store the sent media files and images in a centralized folder, for example a directory media at the same level than the Lizmap repositories folders:
media
images <– to store images in this folder, use:
../media/images/pdf
environment
trees.qgs
trees.qgs.cfg
media
tree_pictures/ <– to store images in this folder, use:
media/tree_pictures/
Filtered layers - Filtering data in function of users
Presentation of the function
Usually, the management of projects Lizmap access rights is via directory. Configuration is done in this case in the Lizmap Web Client administration interface. See Definire i diritti per ogni gruppo. This will completely hide some projects based on user groups, but requires a directory and project management.
Instead, the filtering feature presented here allows you to publish a single project QGIS, and filter the data displayed on the map based on the logged in user. It is possible to filter only vector layers because Lizmap uses a column in the attribute table.
Filtering currently uses the ID of the user group connected to the Web application. He is active for all requests to the QGIS server, and thus concerns:
the vector layers images displayed on the map
the popups
the Locate by layer feature lists. See Add the localization function
drop-down lists of Editing forms from Value relation. See Editing data in Lizmap
upcoming features (the attribute table display, search features, etc.)
A video tutorial is available at: https://vimeo.com/83966790
Configuration of the data filter tool
To use data filtering tool in Lizmap Web Client, you must:
use QGIS 2 and above on the server
have access to the administration interface of Lizmap Web Client
Here are the detailed steps to configure this feature:
Knowing the identifiers of user groups configured in the Lizmap Web Client adminstration interface. For this, you must go to the administration interface : ID appears in parentheses after the name of each group (under the title Groups of new users)
- For all vector layers which is desired filter data, just add a text column that will hold the group ID for each line (not the name !!) who has the right to display this line.
Fill this column for each line of the attribute table with the identifier of the group who has the right to see the line (using the calculator, for example).
It is possible to set all as the value in some lines to disable the filter: All users will see the data from these lines.
If the value in this column for a row does not correspond to a user group, then the data will be displayed for no user.
Add the layer in the table Filter Data by User located in the plugin Lizmap Tools tab:
Select layer from the dropdown list
Select the field that contains the group identifier for the layer
Add the layer in the list with the button Add layer
To remove a layer of the table, click on it and click the button Delete the layer
Disable the client cache and cache server for all filtered layers. Otherwise, the data displayed will not be updated between each connection or user logout!
Time Manager - Animation of temporal vector layers
You can create animations of your vectors, provided you have at least a layer with a column with a valid date/time. You should select from the plugin:
at least one layer with the date/time
the column with the date/time
the number and type of time units for each step of the animation
the duration, in milliseconds, of each step (the default is to display each 10 days block for one second)
one field to display as a label when hovering with the mouse over the objects
optionally, an ID and a title for groups of objects.
When ready, your web application will display the symbol of a watch; clicking on it will open a small panel that will allow you to move between steps, or paly the entire animation. At startup, the application will load the entire table, so if you have thousands of objects you may need to wait for several seconds before the application is available.
A video tutorial is available here: https://vimeo.com/83845949. It shows all the steps to use the functionality.
Demonstration site: http://demo.lizmap.3liz.com/index.php/view/?repository=rep6
Nota
Several different formats for date/time are acceptable (those supported by the JavaScript library DateJS). You can check whether your format is supported by entering it in this page: http://www.datejs.com/
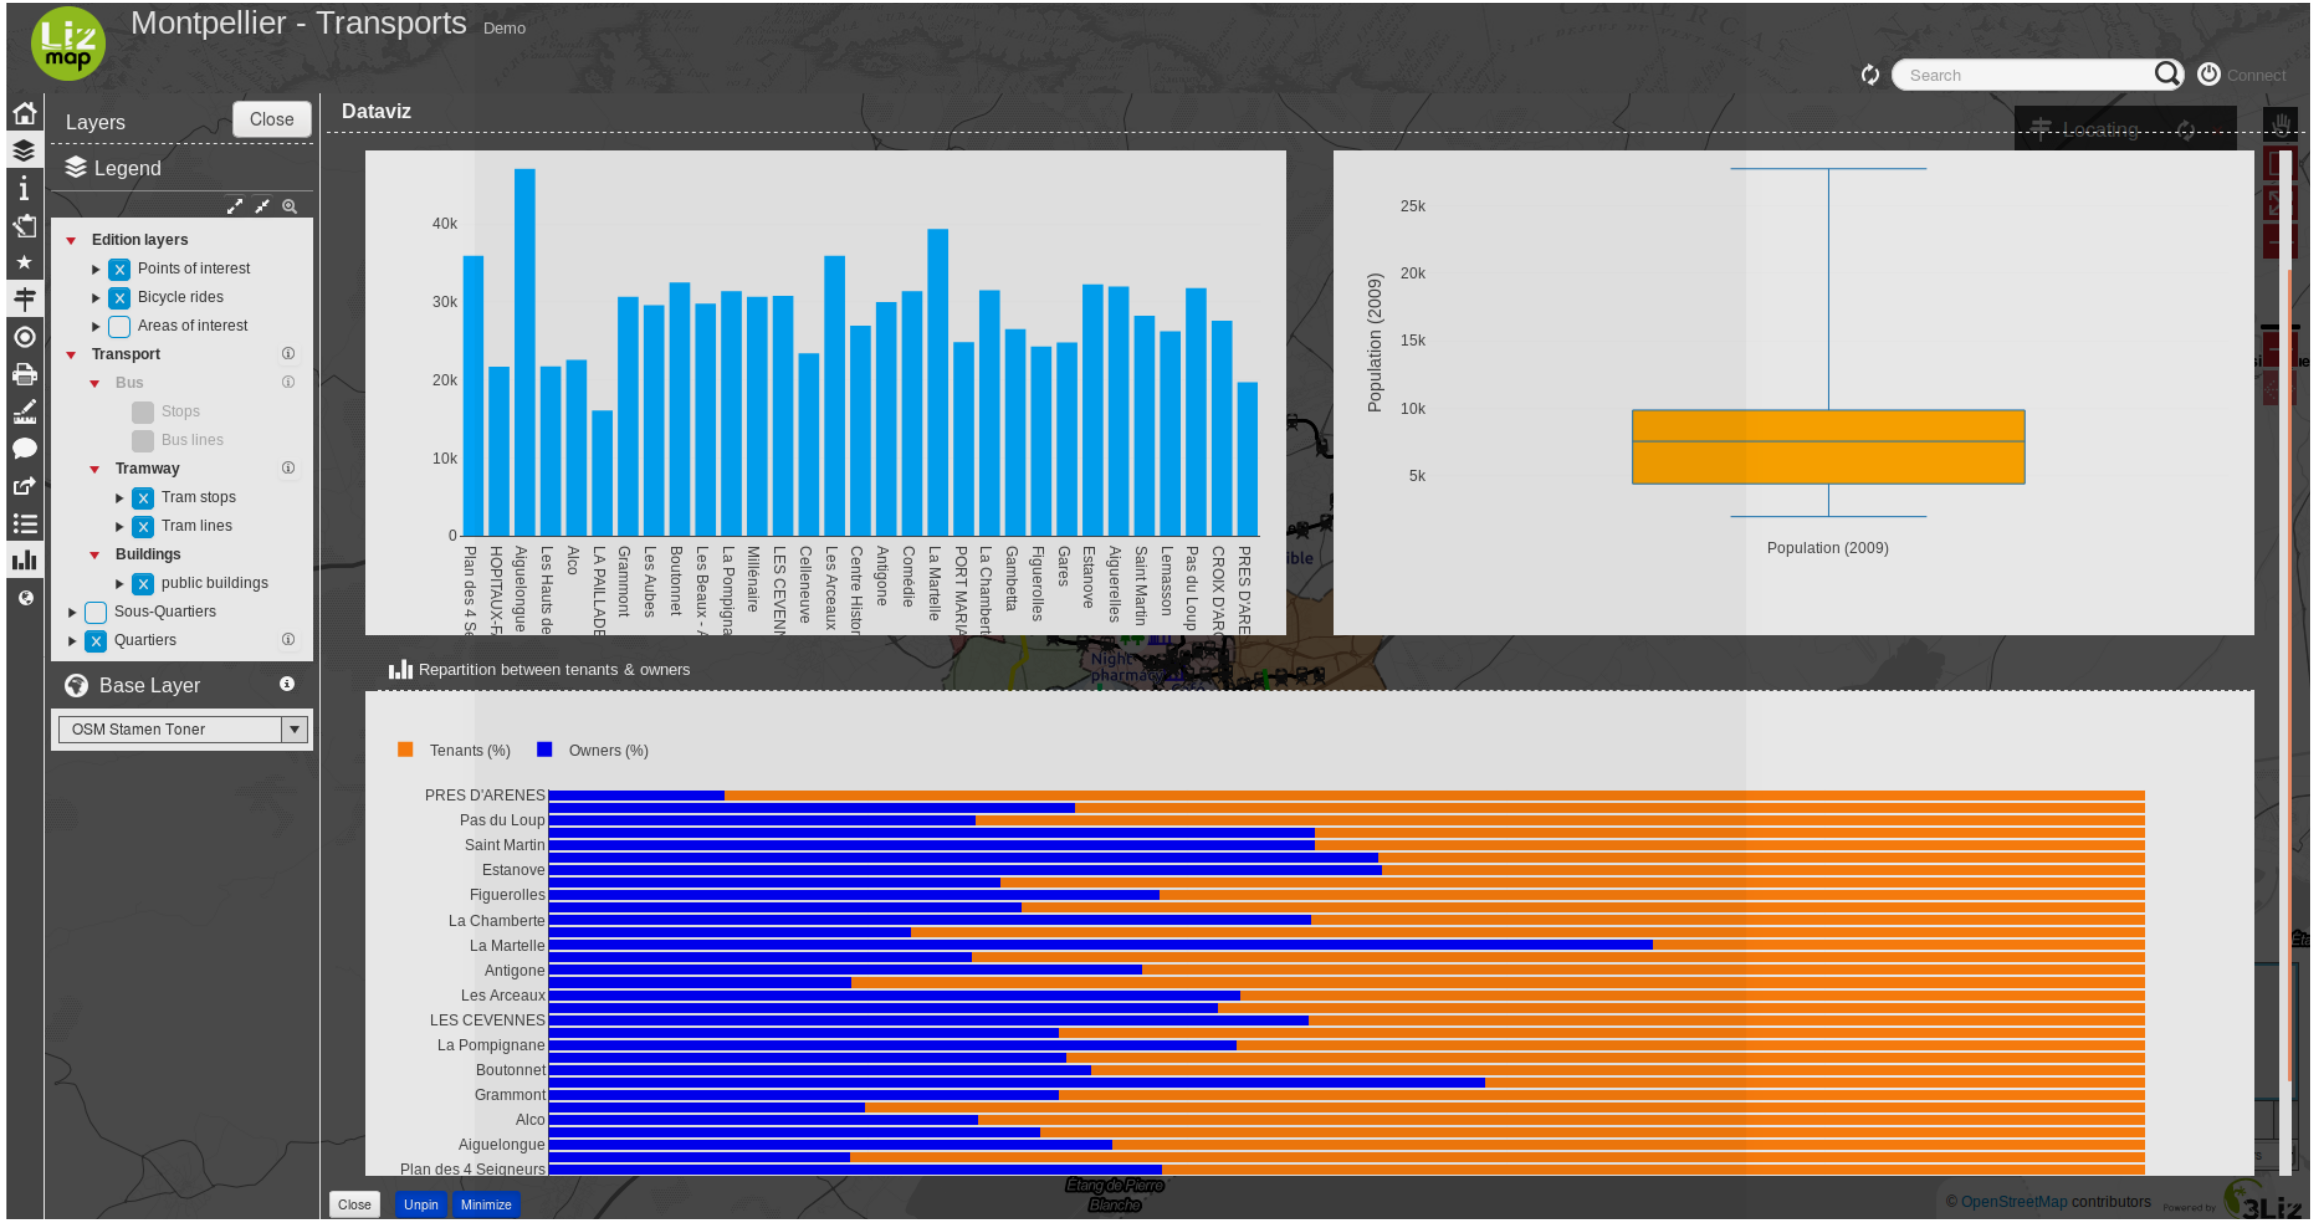
Statictics with Dataviz
In the 3.2 version of Lizmap, a way to show charts in Lizmap is implemented. You will be able to create a few kinds of graph (scatter, pie, histogram, box, bar histogram2d, polar) with only a few clicks.
You can easily configure it with the plugin Lizmap in Qgis in the Dataviz panel.
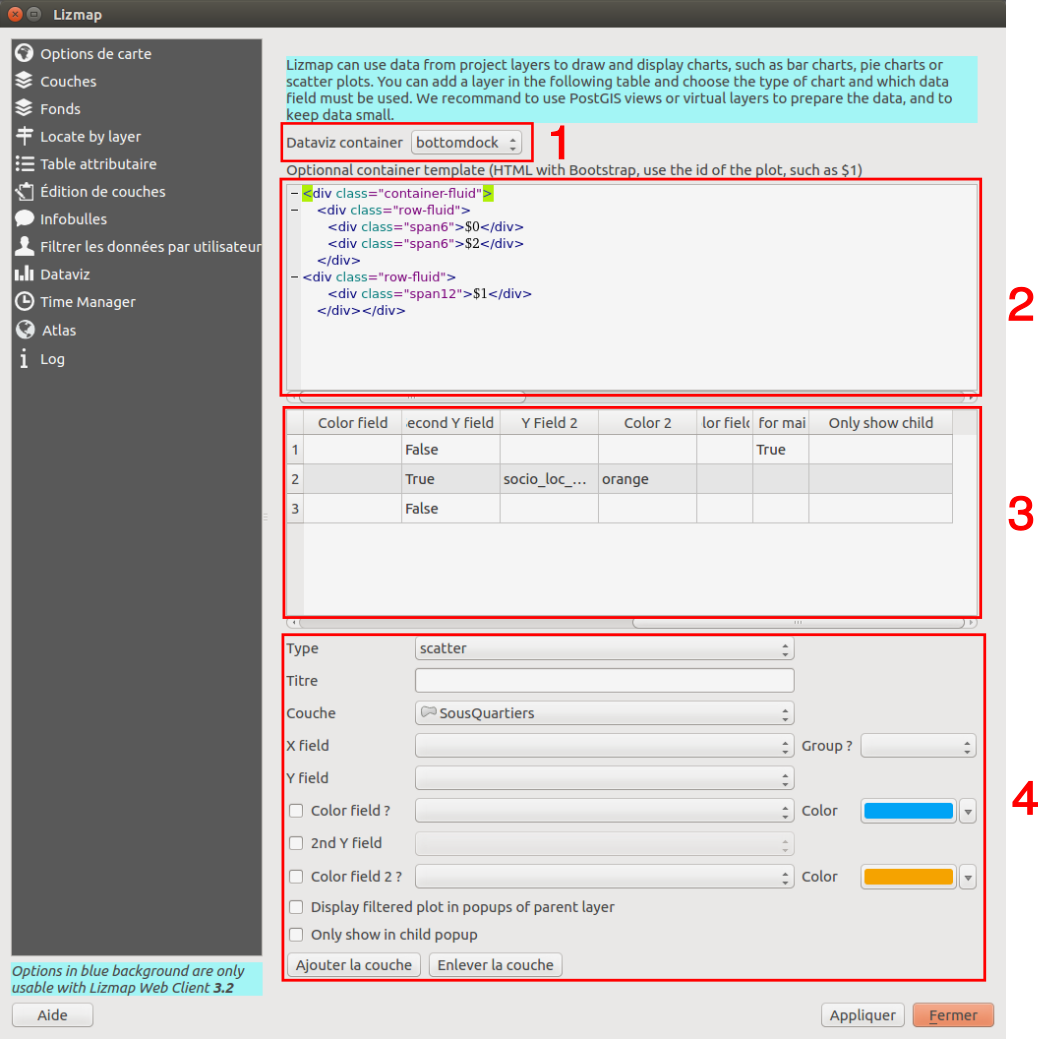
1 : You have the possibility to change the value to dock, bottomdock or right-dock these options change where your dataviz panel will be located in your Lizmap’s project. You have 3 positions available, at the right of the screen, bottom and right.
2: Here, you have the possibility to write in HTML to change the style of the container of your charts. If you are proficient in the HTML language, there are a lot of possibilities and you can customize your container the way you want.
3: This table contains all the layers you have configured to be able to show statistics in your Lizmap project. All details about the configuration are shown in this table. You have to use it if you want to remove a layer, you will need to click on a line of the table then click on the button remove a layer at the bottom on the panel.
4: To add a graph, you have to configure it in this part of the panel.
Type : You can choose the type of your graph, the available options are - scatter, box, bar, histogram, histogram2d, pie and polar.
Title : Here you can write the title you want for your graph.
Layer : You chose which layer you want to make a graph with.
X field : The X field of your graph.
Y field : The Y field of your graph.
Group? : For a few types of charts like “bar” or “pie”, you can chose to aggregate the data in the graph. There are a few aggregate functions available - average(avg), sum, count, median, stddev, min, max, first, last
Color field : you can choose or not a color field to customize the color of each category of your chart. If you want to do it, you need to check the checkbox, then chose the field of your layer which contains the colors you want to use. The color can be written like “red” or “blue” but it can be an HTML color code like “#01DFD7” for example.
2nd Y field : You can add a second Y field, it does not work for every type of graph, it’s only working for histogram2d.
Color field 2 ? : You can chose the color of the second Y field the same way you chose the one for his first Y field.
Display filtered plot in popups of parent layer : if you check this checkbox, the children of your layer will get the same graph as the parent plot but filtered only for them. It’s useful if you want to see the statistics of one entity instead of all.
Only show child : The main graph will not be shown in the main container and only the filtered graph of the relation of the layer will be displayed in the popup when you select the element.
When all the configuration is done, you have to click on the button add a layer at the bottom of the window.
Atlas - sequence of entities of a chosen layer
This feature let you chose and configure a layer to make her into an atlas in your Lizmap project.
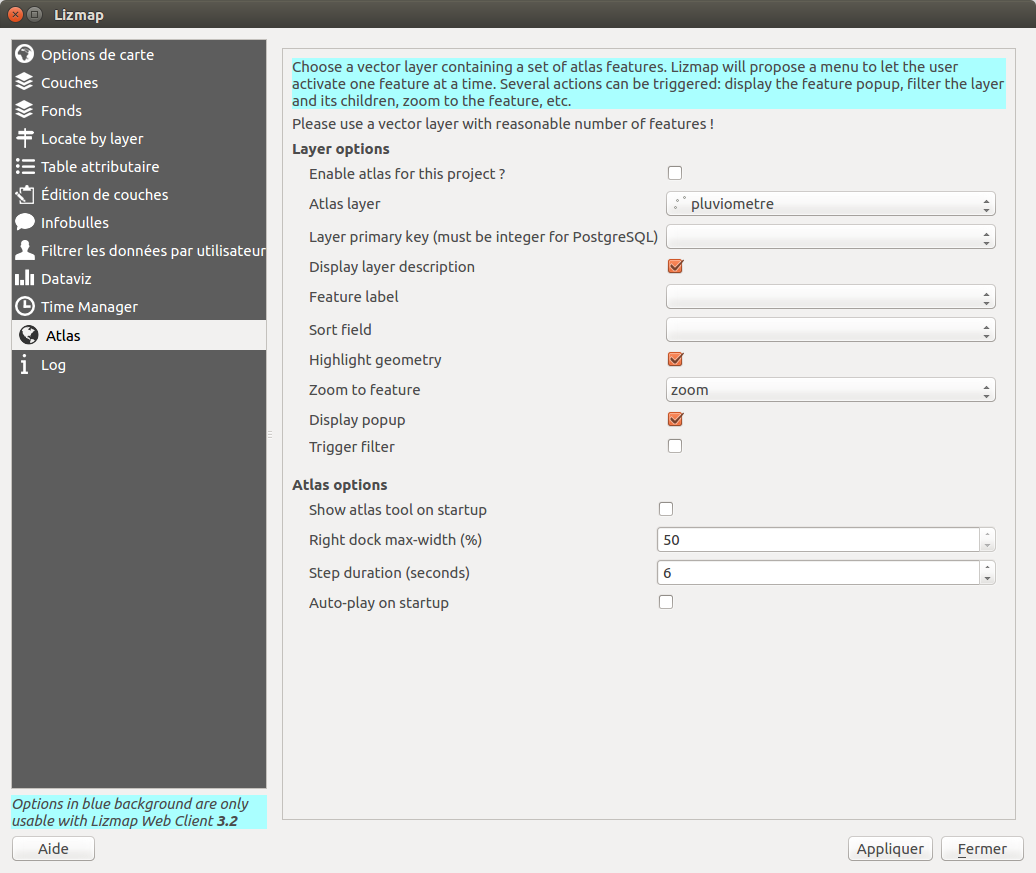
Layer options :
the atlas is enabled or not in your project
you need to chose the layer you want your atlas on
select the primary key field, it must be an integer
check if you want to display the layer description in the dock of your atlas
chose the field who contains the name of your features, it will be shown instead of the primary key in the list of features
your atlas will be sorted according to this field
you can chose to highlight the feature selected by the atlas, it will change every time it’s switching to a new feature
chose between a zoom on the feature or to make it the center of your map
you can chose to display the popup in the feature in the atlas container or not
check if you want to activate filter on the feature selected by the atlas, it will hide all other features of the layer and only show the one selected
Atlas options:
check if you want to open the atlas tool when you open your project
you can chose the size of the atlas dock (20%-50%)
you can select the duration between each step when your atlas is in auto-play mode
check if you want to launch the auto-play mode when you open your project
Form filtering - Filter layer data based on field values
Presentation
This tool, available since Lizmap Web Client 3.3, displays a form in the left panel, based on some fields, and allow the users to search among the layer data with a variety of form inputs: combo boxes, checkboxes, text inputs with autocompletion, date selector with sliders between the min and max date, etc..
It works only for database layers: PostgreSQL (recommended), Spatialite and GeoPackage, since Lizmap should query the data to retrieve:
the total count of features for the current filter
the unique values of some fields (for the Unique Values type for example)
the minimum and maximum of the numeric fields or date fields
the extent of the data for the current filter
You can see a video with an example: https://vimeo.com/331395259
Configuration
There is a new tab in the Lizmap plugin ( for QGIS 3 only) which lets you configure the filter inputs based on the layer fields. You can add one or more fields for one or more layer. If you add fields from 2 or more different layers, Lizmap Web Client will show a combo box to allow the user to choose the layer to filter. Selecting a layer will refresh the form and deactivate the current filter.
The layer must be published in the WFS capabilities group of the Project properties OWS Server tab.
You need to add a line in the plugin table for each field you need to add in the filter form. For each field, you need to configure some options:
Layer: the source layer.* Title: the title to give to the input, which will be displayed above the form input. For example «Choose a category» for a layer field called «category»
Type: the type of the form input, among one of the following: Text, Unique Values, Date, Numeric
Field: the field name (in the database table). Only for the Text, Unique Values and Numeric types.
Min date: the field containing the start date of your object (ex: «start_date» of an event). This is only needed for the Date type. If you have only one date field in your data, you should select it in the Min Date field.
Max date: the field containing the end date of your data. If you have 2 fields containing dates, one for the start date and another for the end date, you can differentiate them. If not, you need to use the same field name for Min date and Max date.
Format: the format of the Unique values type only. It can be select, which will show a combo box, or checkboxes which will show one checkbox for each distinct value. The distinct values are dynamically queried by Lizmap Web Client.
Splitter: for tje Unique values type only. Use if you want to split the field values by a separator. Ex: “culture, environment” can be split into “culture” and “environment” with the splitter “, “.
The order of the lines in the configuration table is taken into account to show the field inputs in the form.

Description of the different form input types
Text
This is the simplest type. With this type of input, the user will see a classical text input. You can type any text then validate. Autocompletion is enabled by default, which means Lizmap will retrieve the unique values for this field. This could be an option in the future if some datasets are too big and this autocompletion feature is too heavy.
The filter built will be like: «field» LIKE “%foo%”
Data
This input type will show a slider with 2 handles to allow to search between the two selected values. The two text inputs are also shown and can be used to manually set the min and max dates.
The date is «truncated» to a date (no time data such as hour, minutes or seconds yet).
The slider step is hard coded and equals to 86400 seconds, which means 1 day.
The filter built will be like: ` ( ( «field_date» >= “2017-04-23” OR «field_date» >= “2017-04-23” ) AND ( «field_date» <= “2018-06-24” OR «field_date» <= “2018-06-24” ) ) «`
Numeric
This input type will show a slider with 2 handles to allow to search between the two selected values. Two text inputs are also shown and can be used to manually set the min and max values.
The filter built will be like: ` ( ( «field» >= 100 ) AND ( «field_date» <= 200 ) ) «`
Unique values
Lizmap will query the data to get the distinct values of the field. You can choose two different input types: select or checkboxes.
If you have specified a splitter text, for example , `, Lizmap will find the unique values of the separated text values. Fo xample the value of one feature `”culture, environment” will be split into “culture” and “environment” with the splitter “, “. Selecting culture or environment in the form input will show this feature.
You can choose to show two different input types:
Combo box: this type will show a combo box with the list of distinct values for the field. The user will be able to choose only one item among the values.
Checkboxes: this type will show as many comboboxes as distinct values for the field. The data will be filtered with a UNION between checked items.
The filter built will be like: ( "field_thematique" LIKE “%Cuisine%” OR "field_thematique" LIKE “%Ecocitoyen%” )
Changing the default image of a project in the repositories and projects site
By default the following image is displayed for a project:
You can change this default image by adding in the same project folder a .png image with the exact project name and extension. Example: If the project is called montpellier.qgs you can add an image named montpellier.qgs.png. Note that the image has the project extension too.